
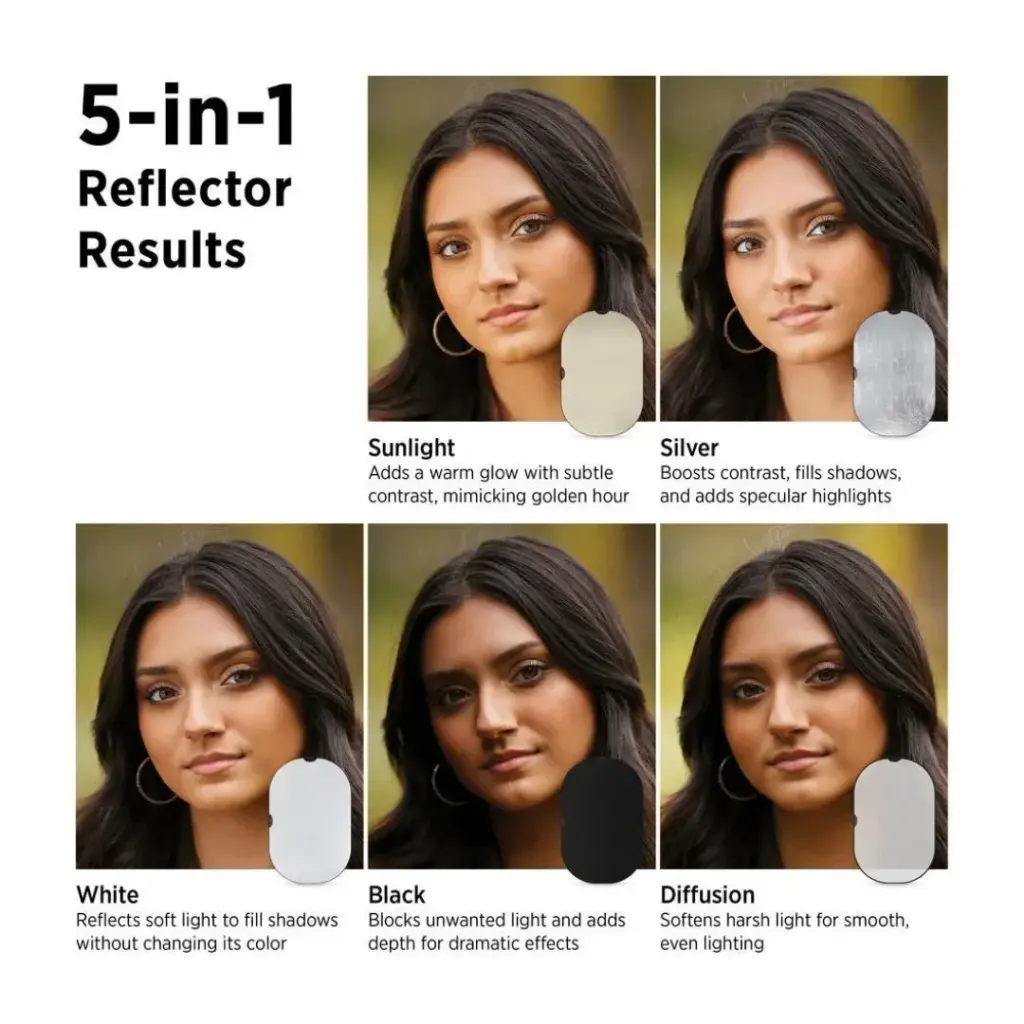
Photography reflectors bounce existing light back onto a subject to fill shadows, while diffusers sit between the light and the subject to soften harsh rays. Together, these inexpensive tools control contrast and quality of light outdoors and in the studio, often making the difference between a flat or harsh picture and a pleasing one.
Why It Matters
Light is the most important part of any photograph, and most scenes do not come with perfect light. Midday sun creates hard shadows under the eyes, and window light can leave one side of a face dark. Reflectors and diffusers let you reshape that light without carrying flashes or stands.
They are light, cheap and simple, and they work with any camera. A reflector costs less than a lens cap on some lenses, yet it changes how a portrait or product looks.
Beginner Using Reflectors And Diffusers
Types Of Reflector Surfaces
Most 5-in-1 reflector kits include several surfaces and a diffuser panel.
| Surface | Effect | Best use |
|---|---|---|
| White | Soft, neutral fill | Portraits, products |
| Silver | Bright, contrasty fill | Overcast days, strong fill |
| Gold | Warm fill | Skin warmth, sunset look |
| Black | Absorbs light, adds shadow | Increasing contrast, flag |
| Translucent | Diffuses light | Softening harsh sun |
Steps To Use A Reflector
- Position the subject with light coming from the side or behind.
- Hold the reflector opposite the light source, at the subject’s side or below the face.
- Angle the reflector to catch the light and bounce it toward the subject.
- Move closer for stronger fill and farther for subtle fill.
- Check the catchlights in the eyes and the shadows under the chin and nose.
- Adjust the angle until the shadows look natural.
Using A Diffuser
Hold the diffuser between the sun and the subject, close to the subject but out of frame. It turns the sun into a large soft source. The closer the diffuser, the softer the light, and a bigger diffuser gives more even results. A 40-inch round diffuser suits headshots, while a larger panel handles full-body portraits. See shooting in harsh midday sun.
Choosing A Size
Small reflectors of 12 inches are good for close-up and product work, 32 to 42 inches suit portraits, and 5 by 7 foot frames cover groups. Round collapsible ones are easy to carry. Having an assistant, a light stand with a clamp, or a reflector holder helps a lot.
Common Mistakes
- Using silver reflectors too close, which makes the subject squint.
- Aiming the reflector from above, creating unnatural light.
- Forgetting that gold can look orange.
- Letting the reflector appear in the frame.
A Quick Exercise
Photograph a friend in open shade, first without a reflector, then with white and silver. Compare the light in the eyes.
Handy for this: Softbox And Light Kit — soft, flattering light. (affiliate link)
Advanced Advanced Placement For Photography Reflectors
Light Ratios And Fill
A reflector reduces contrast by filling shadows. Placing it close creates a low ratio and a soft look, while moving it away raises contrast. For a dramatic look, use black cards to block fill and deepen shadows. See lighting ratios and low key and high key.
Reflector Positions For Portraits
A reflector held below the face, pointing up, fills shadows under the eyes, nose and chin, producing a clean beauty look. A side reflector fills one side of the face, which is useful with window light. A reflector behind the subject can add rim light from the sun. Find more in portrait lighting patterns, window light photography and short lighting.
Outdoor Techniques
Place the subject in open shade, and use a white reflector to bring in more light, or use a gold reflector at sunset for warm tones. With the sun behind the subject, use a reflector to light the face and keep a halo of backlight. In bright sun, use the diffuser overhead and a reflector for fill. See open shade light, golden hour photography and rim light and silhouettes.
Studio And Product Work
Use white foam boards, black cards and mirrors to shape small scenes. White boards add soft fill and reflections on glossy products, and black cards deepen edges. A simple setup with one window or light and a few cards can produce professional results. See product photography, DIY light tent and macro lighting.
DIY Reflectors And Diffusers
You can make your own. Cover a piece of cardboard with aluminum foil for silver, use white foam board for neutral fill, or use a white bed sheet or shower curtain for diffusion. Crumpled foil gives a softer reflection than smooth foil. See DIY foil reflector, shower curtain diffuser and shoebox light modifier.
Reflectors With Flash
Reflectors and diffusers work with flash too. Bounce flash off a white ceiling or card, or fire a speedlight through a diffuser panel to make a soft source. Add reflectors to fill from the other side. See bounce flash and softbox versus umbrella.
Video Use
Filmmakers use reflectors and diffusers constantly. A large diffusion frame softens sun, and bounce boards fill faces on location. Choose a surface that matches the key light color, and avoid creating a double shadow. See video lighting and three-point lighting.
Care And Handling
Fold collapsible reflectors carefully by twisting, and keep them in their case. Wipe away dirt, because stains reduce reflectivity. In wind, a reflector can act as a sail, so use stands, sandbags, or an assistant. Keep spare clamps and tape in the bag.
Reflectors And Diffusers Working Together
On a bright day, use the diffuser to soften the sun on the subject’s face, then add a reflector from the opposite side to lift the shadows. With two people, one can hold the diffuser overhead and the other can angle the reflector. If you work alone, clamp the diffuser to a light stand and hold the reflector yourself, or place the reflector on a chair leaning against a wall. This simple pairing gives results similar to a softbox and fill card in the studio.
Quick Checklist Before You Shoot
- Is the light direction clear before adding fill?
- Is the reflector the right color for the skin tone and the scene?
- Are the catchlights natural, not harsh?
- Is the diffuser close enough to soften, yet out of frame?
- Is the camera white balance set so that gold or silver does not cause an unwanted color shift?
Try It
- Take a portrait in open shade with no reflector, then with white, silver and gold.
- Use a diffuser over a subject in direct sun and compare the shadows.
- Make a foil reflector from cardboard and test it on a product.
- Move the reflector closer and farther and watch the shadow depth.
Common Questions
What is the difference between a reflector and a diffuser?
A reflector bounces light onto the subject to fill shadows. A diffuser sits between the light and the subject to soften the light.
Which reflector color should I use?
White is the most natural, silver is stronger, gold adds warmth, and black removes light to increase contrast.
Can I use a reflector indoors?
Yes. Use it with window light, lamps or flash, to fill shadows or add a catchlight.
What size reflector do I need?
A 32 to 42 inch round reflector covers most portrait needs, while smaller ones suit products.
Related Lessons
- Harsh Midday Sun for managing strong light.
- Open Shade Light to find soft natural light.
- DIY Foil Reflector to make a cheap one.
- Portrait Lighting Patterns for placing light and fill.
- Window Light Photography for indoor use.
Gear That Helps With This
Hand-picked kit that makes this lesson easier to put into practice.
Some links are affiliate links: if you buy through them we may earn a small commission at no extra cost to you. How this works.