
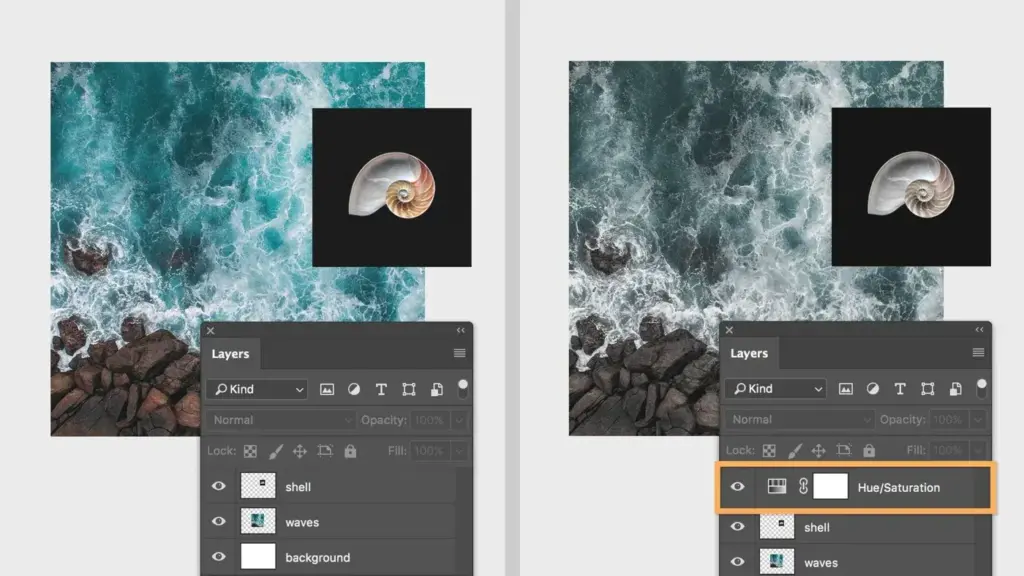
Adjustment layers apply color and tone changes, such as Curves, Levels or Hue/Saturation, as separate layers above your photo. They do not alter the image pixels, each comes with a layer mask, and you can reopen, change, hide or delete them at any time. This makes them the standard way to edit non-destructively in Photoshop.
Why It Matters
The Image menu also contains Adjustments such as Curves and Hue/Saturation, but those change pixels directly. After a few edits and a save, the changes are baked in. Adjustment layers give the same result with an important difference: the edit stays live.
They make experimenting safe. You can lower the strength, restrict the effect to one area with the mask, or throw it away entirely. Your original photo is never harmed.
Beginner Adding And Using Adjustment Layers
An adjustment layer sits above the layers it affects, and its effect applies to everything underneath it. If you move it up or down in the Layers panel, the range of layers it changes also moves. At the top of the stack, it affects the whole image.
Add One
- Open a photo. Click the Create New Fill or Adjustment Layer button at the bottom of the Layers panel. It looks like a circle split into a black half and a white half.
- Choose an adjustment from the list, such as Curves, Levels or Hue/Saturation.
- The Properties panel opens with controls. Move the sliders to change the image.
- To change it later, click the adjustment layer and the Properties panel returns with your settings.
You can also use the Layer menu, then New Adjustment Layer, or the Adjustments panel, which shows an icon for each type.
Common Adjustment Types
| Adjustment | What it does | Good for |
|---|---|---|
| Brightness/Contrast | Simple tone shift | Quick fixes |
| Levels | Sets black point, white point and midtones | Fixing flat images |
| Curves | Precise control over tone | Contrast and color casts |
| Hue/Saturation | Shifts color and intensity | Changing or muting colors |
| Vibrance | Boosts muted colors more than strong ones | Natural color lift |
| Black and White | Converts to monochrome with color sliders | Black and white conversions |
| Color Balance | Shifts color in shadows, midtones, highlights | Fixing color casts |
Limit An Adjustment With The Mask
Each adjustment layer has a white layer mask. Click it, press B for the Brush, and paint with black to remove the effect from an area. For example, add a Curves layer to brighten the image, then paint black over the sky to leave it unchanged. Full mask basics are in layer masks.
Clip It To One Layer
By default, an adjustment affects all layers below. To limit it to the single layer directly under it, click the clipping icon at the bottom of the Properties panel. It looks like a small square with a downward arrow. The adjustment then applies only to that layer.
Change Strength And Mode
Use the Opacity slider on the adjustment layer to reduce its strength. Setting the blend mode to Luminosity stops a Curves or Levels adjustment from changing color, which prevents shifts in saturation when you add contrast. Blend modes are covered in blend modes.
Common Mistakes
- Using the Image menu adjustments on the only copy of a photo, then saving over it.
- Stacking many adjustments that fight each other, such as two contrast boosts.
- Forgetting that an adjustment at the top of the stack affects all layers below, including ones you wanted unchanged.
- Painting on the photo layer when the adjustment mask was meant to be active.
Handy for this: Pen Tablet — precise retouching. (affiliate link)
Advanced Building A Clean Adjustment Stack
Name And Organize Layers
Double-click an adjustment layer’s name and give it a clear label such as Sky Contrast or Face Brighten. When a file has fifteen adjustment layers, names make it possible to understand your own work a month later. Put related layers in a group using Ctrl+G or Command+G, and give the group a mask when needed. Colors can be assigned to layers through a right-click menu to separate roles at a glance.
Order Matters
Adjustments are applied from bottom to top, so a different order can produce a different result. A common order is: corrections first, such as exposure and white balance, then contrast and tone, then color changes, then creative effects such as a color grade. Sharpening is usually applied last. If an image looks wrong after a change, try moving the layer up or down to see how the order alters the effect.
Selective Edits With Luminosity
You can limit an adjustment to bright or dark areas by building its mask from the image tones. This keeps edits smooth and looks natural. For example, add a Curves layer to lift shadows and mask it so it only affects the darker parts. Methods are in luminosity masks.
Curves For Fine Control
Curves is the most powerful tool in the list. The graph maps input tone on the horizontal axis to output tone on the vertical axis. Dragging the line up brightens, dragging it down darkens, and an S-shaped curve adds contrast. A dedicated lesson covers the details in Curves in Photoshop. Use the on-image adjustment tool in the Curves panel to click a part of the picture and drag, which creates a point at that tone.
Targeted Color Changes
Hue/Saturation has a menu at the top of its properties that lets you target a range such as Reds or Blues rather than Master. With a range chosen, use the sliders or the hand tool on the image to shift only those colors. The Color Range selection can also create a mask for a particular color before you add the adjustment.
Saving And Sharing
Save a layered PSD or TIFF to keep adjustment layers editable. Exporting to JPEG flattens the image, so keep the layered master file safe. If you need to send a layered file to another person, check that they use a version of Photoshop that supports the adjustments you used.
Copying Adjustments Between Photos
Drag an adjustment layer from one document tab to another to copy it over. This is useful when you need the same look across a series of photos. For large batches, the better method is to record the steps in an action, described in Photoshop actions. Keep in mind that different exposures may need small corrections after the transfer.
Performance
Each layer takes memory, but adjustment layers are light compared with pixel layers. A file with dozens of them is generally fine. When a document slows down, merge finished pixel layers rather than adjustment layers, and save a copy of the layered file first.
Try It
- Open a photo and add a Curves adjustment layer from the circle icon at the bottom of the Layers panel.
- Make a gentle S-curve and notice how the image gains contrast, then lower the layer opacity to dial it back.
- Click the layer mask, paint black over the sky with a soft brush, and see the sky return to its original look.
- Add a Hue/Saturation layer, pick a color range from the menu, and shift that color only.
- Rename each layer, group them, and hide the group using the eye icon to compare with the original.
Common Questions
What is the difference between an adjustment layer and a normal adjustment?
A normal adjustment from the Image menu changes pixels permanently once saved. An adjustment layer is a separate, editable layer that leaves the pixels untouched, so you can change or remove it later.
How do I apply an adjustment layer to just one layer?
Use the clipping icon at the bottom of the Properties panel, or hold Alt on Windows or Option on macOS and click between the two layers. This clips the adjustment to the layer beneath it.
Do adjustment layers make files larger?
Only slightly. They store settings and a mask rather than full pixels, so they add very little compared with extra pixel layers.
Will adjustment layers survive saving as JPEG?
No. JPEG flattens the image and keeps no layers. Save a PSD or layered TIFF as your master, and export JPEG copies from it.
Related Lessons
- Layer Masks to control where each adjustment applies.
- Curves In Photoshop for the most precise tone and color control.
- Blend Modes to avoid color shifts and change how layers mix.
- Luminosity Masks to limit adjustments to highlights or shadows.
- Smart Objects to keep filters and transforms editable too.
Gear That Helps With This
Hand-picked kit that makes this lesson easier to put into practice.
Some links are affiliate links: if you buy through them we may earn a small commission at no extra cost to you. How this works.