
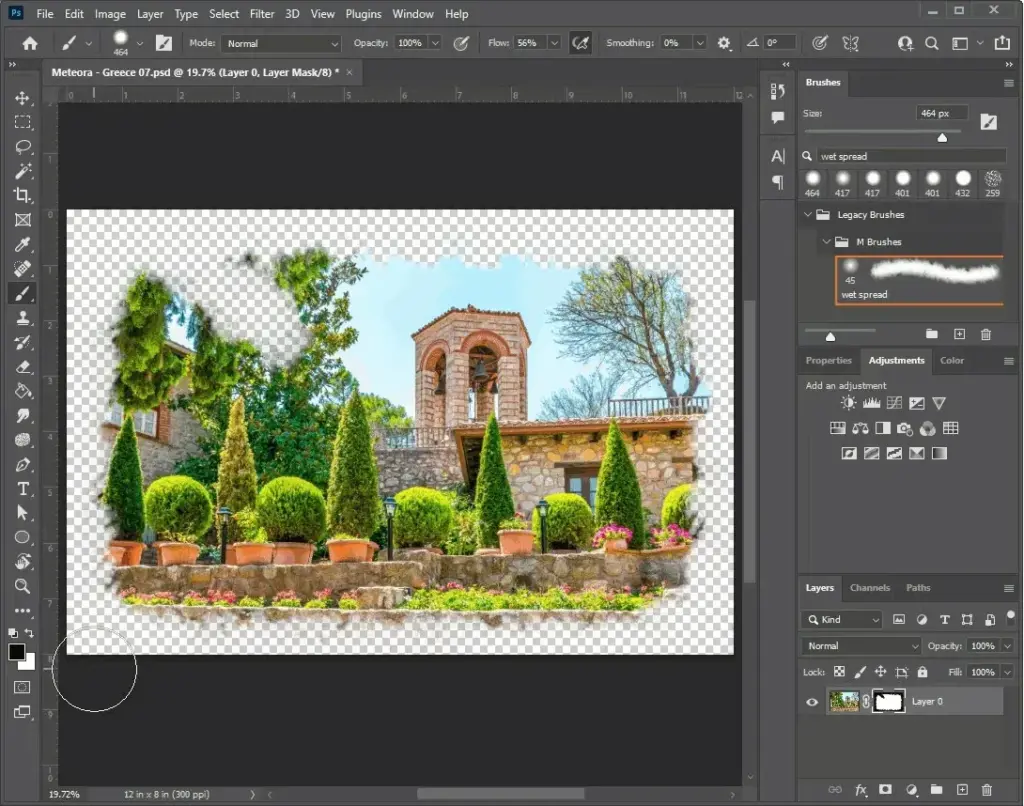
Layer masks control which parts of a layer are visible without deleting any pixels. Each mask is a grayscale image attached to a layer: white shows the layer, black hides it, and shades of gray give partial transparency. Because the hidden pixels remain, you can change your mind and repaint the mask at any time.
Why It Matters
Deleting pixels with the Eraser is permanent once you close the file. Layer masks give the same visual result while keeping every original pixel safe. If you hide too much, you paint it back. If the edge looks wrong, you adjust it.
Masks are also the basis of almost every advanced Photoshop technique, from blending exposures and replacing skies to dodging and burning. Learning them well pays off in every other lesson.
Beginner How Layer Masks Work
Think of a mask as a stencil laid over a layer. Where the mask is white, the layer shows through. Where it is black, the layer is hidden and the layers below appear. Gray areas show part of the layer, so 50 percent gray is about half transparent. Only black, white and gray exist in a mask, since the mask is a grayscale image.
Add A Mask
- Select a layer in the Layers panel.
- Click the Add Layer Mask button at the bottom of the panel, which looks like a rectangle with a circle inside. A white thumbnail appears beside the layer thumbnail.
- To start with the layer hidden, hold Alt on Windows or Option on macOS while clicking the button. The mask is filled with black.
A white mask changes nothing yet. It becomes useful when you paint on it.
Paint On A Mask
- Click the mask thumbnail so it has a white border, showing the mask is active and not the layer pixels.
- Press B for the Brush tool and D to reset the colors to black and white.
- Paint with black to hide parts of the layer. Press X to swap to white and paint to reveal them again.
- Use a soft-edged brush for blends and a hard-edged brush for sharp edges. Lower the opacity in the options bar for gentle changes.
The most common beginner mistake is painting on the layer thumbnail rather than the mask. Always check which thumbnail is selected before you paint.
Quick Mask Tips
- Press Ctrl+I on Windows or Command+I on macOS with the mask selected to invert it.
- Hold Shift and click the mask thumbnail to turn the mask off temporarily. A red X appears across it.
- Hold Alt or Option and click the thumbnail to view the mask on its own in black and white.
- Use the Gradient tool on a mask with a black-to-white gradient for smooth blends between two photos.
Masks From Selections
If a selection is active when you click the Add Layer Mask button, the selection becomes the mask, with the selected area shown and the rest hidden. This is the standard way to turn a rough cutout into an editable one. Selection basics are covered in Photoshop selection tools.
Common Mistakes
- Using the Eraser on the layer instead of painting a mask, losing pixels permanently.
- Forgetting to reset foreground and background colors, so the brush paints in unexpected colors that act as gray.
- Working with a heavily feathered brush on fine edges, creating halos.
- Applying the mask too early, which removes the hidden pixels for good.
Handy for this: Pen Tablet — precise retouching. (affiliate link)
Advanced Refining And Using Masks Like A Pro
The Properties Panel
With a mask selected, open the Properties panel by choosing Window, then Properties. It offers Density, which controls how strongly the mask hides, and Feather, which blurs the mask edge across the whole mask. These sliders work non-destructively, so they adjust the mask itself without repainting. The Select and Mask button in the panel opens the refinement workspace described in Select Subject and Select and Mask.
Link, Unlink And Move
A small chain icon between the layer thumbnail and mask thumbnail shows that they are linked. When linked, moving or transforming the layer moves the mask with it. Click the chain to unlink them so that you can slide the layer under a fixed mask, which is useful when repositioning a texture inside a shape.
Stacking And Combining Masks
A layer can hold a pixel mask and also a vector mask, a sharp-edged mask created with shapes. You can also mask a group, which affects everything inside it at once. For a combined effect, put several layers in a group and add a mask to the group instead of each layer. This keeps editing simple and the Layers panel tidy.
Clipping Masks Versus Layer Masks
A clipping mask uses the pixels of the layer below to decide what is visible. A layer mask uses a grayscale image painted for that layer. Choose a clipping mask to confine an effect to the shape of one layer, and a layer mask for freehand control. Right-click a layer and choose Create Clipping Mask, or hold Alt or Option and click between two layers.
Masks On Adjustment Layers
Every adjustment layer comes with a layer mask already attached. Painting black on it removes the adjustment from that area, which allows targeted edits such as darkening a sky or brightening a face. This pairing is the heart of non-destructive editing and is explained in adjustment layers.
Luminosity Masks And Channels
A selection built from image brightness makes an excellent mask, since it follows the natural tones of the picture. Photographers use these to blend exposures and to affect only the highlights or shadows. The idea is detailed in luminosity masks.
Cleaning Up Mask Edges
A small amount of Gaussian Blur on a mask, applied from the Filter menu while the mask is active, can soften a stair-stepped edge. A Levels adjustment on the mask, opened with Ctrl+L or Command+L, tightens a soft edge by pushing grays toward black or white. Use a light touch and compare against several backgrounds.
Apply Or Keep
To make a mask permanent, right-click it and choose Apply Layer Mask. That deletes the hidden pixels. Do this only for the final flattened file. For files you will revisit, keep the mask, and save a layered PSD or TIFF so your edit stays reversible. Smart objects protect the pixels further, as covered in smart objects.
Mask Density And Opacity
Layer opacity and mask density are not the same. Opacity changes how visible the whole layer is. Mask density sets how much the mask hides, so lowering it to 50 percent makes black areas show half of the layer. Use density when you want to soften a hard mask without repainting it, and opacity when the entire layer should be lighter.
Try It
- Open two photos, place one over the other as a new layer, and click Add Layer Mask.
- Select the Brush tool, press D, and paint with black to reveal the layer beneath, then press X to paint white and restore it.
- Use the Gradient tool with black to white across the mask to blend the two photos smoothly.
- Hold Alt or Option and click the mask thumbnail to view it, then click the thumbnail normally to return.
- Open the Properties panel and move the Feather slider to see the mask edge soften without repainting.
Common Questions
What do black and white mean on a layer mask?
White shows the layer and black hides it. Gray shows part of the layer, so a mid-gray means about half transparency. Remember: white reveals, black conceals.
Why does painting on my mask do nothing?
Most often the layer thumbnail is selected instead of the mask, or the brush color is gray or the opacity is very low. Click the mask thumbnail and press D to reset colors.
Are layer masks better than the Eraser?
Yes for nearly all editing. A mask hides pixels without deleting them, so you can undo the decision later. The Eraser removes pixels permanently once the file is saved.
How do I turn a selection into a mask?
Make the selection, then click the Add Layer Mask button at the bottom of the Layers panel. The selected area stays visible and the rest is hidden.
Related Lessons
- Photoshop Selection Tools to make selections you can convert into masks.
- Adjustment Layers to pair masks with non-destructive color and tone edits.
- Luminosity Masks to mask by brightness for natural blends.
- Select Subject And Select And Mask to build masks for people and products.
- Blend Modes to change how masked layers combine.
Gear That Helps With This
Hand-picked kit that makes this lesson easier to put into practice.
Some links are affiliate links: if you buy through them we may earn a small commission at no extra cost to you. How this works.