
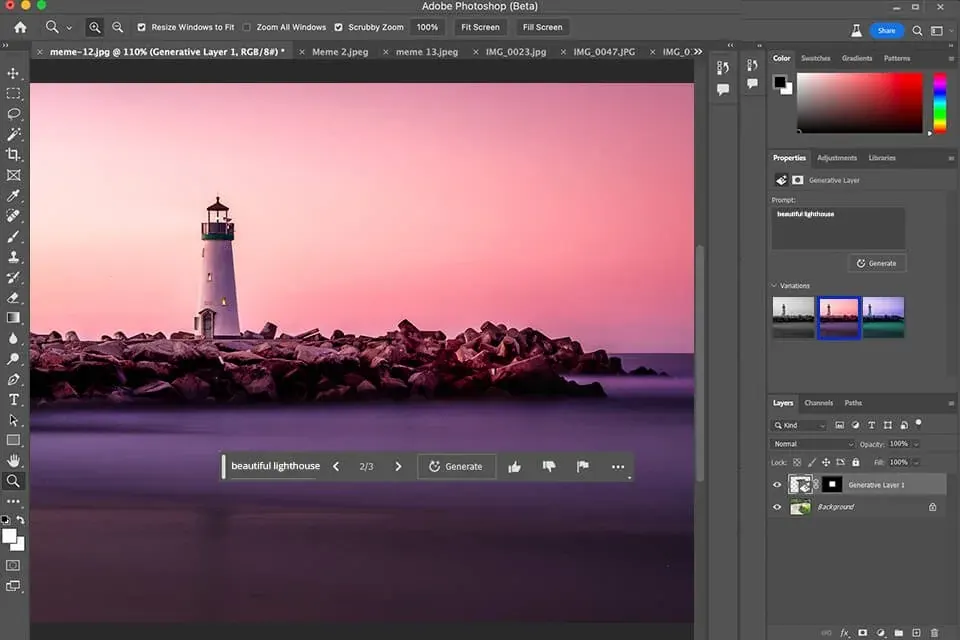
Generative fill is a Photoshop feature that creates new image content inside a selection using a text prompt or no prompt at all. You can remove an object, extend a background, add an element or change part of a scene. Results appear on a separate layer, so you can compare them and discard what does not work.
Why It Matters
Retouching tasks that once took long cloning sessions can now take one selection and a click. That makes it useful for removing distractions, extending canvases and cleaning backgrounds.
It is not perfect. Results can look soft, repeat patterns or miss the lighting of the original, so knowing where it works and where traditional tools do better saves time.
Beginner Generative Fill For Beginners
Generative fill needs a selection first. You draw an area with a tool such as the Lasso or the Rectangular Marquee, and the Contextual Task Bar offers a Generate Fill button. You can type a short prompt or leave it empty to let Photoshop fill the area to match its surroundings.
Basic Steps
- Open the photo and make a selection around the area you want to change. Include a little of the surrounding area.
- Click Generative Fill in the Contextual Task Bar.
- Type a short description, such as grass or blue sky, or leave the prompt empty to remove the object.
- Click Generate and look through the variations in the Properties panel.
- Pick the best one. Hide the layer to compare with the original.
Photoshop may require you to be signed in and to use generative credits, which depend on your plan. Check the current allowance in your account.
Good First Uses
| Task | How To Do It |
|---|---|
| Remove a distraction | Select the object and generate with an empty prompt |
| Extend a background | Enlarge the canvas with the Crop tool, select the empty edge and generate |
| Clean up a sky | Select power lines or specks and generate without a prompt |
| Add simple elements | Select an area and describe a small object, such as a lamp |
Quick Tips
- Select slightly larger than the object so that shadows and edges are included.
- Use short, concrete prompts. Long descriptions often give worse results.
- Work in small areas for better detail instead of one huge selection.
- Keep the original layer so you can mask or reverse the result.
Common Mistakes
- Selecting too tightly, which leaves a ghost of the object or shadow behind.
- Accepting the first result without checking the edges and texture at 100 percent.
- Expecting the fill to match grain, sharpness and color perfectly.
- Using it on a full-resolution image where the generated area is lower in detail than the rest.
Writing Better Prompts
Name the thing you want and its simple attributes, such as a wooden fence, a calm lake or soft clouds. Avoid long stories. If the result does not fit, change one word at a time and regenerate. When removing something, an empty prompt often works better than typing the word for it, because the model otherwise may draw the thing you named.
Handy for this: Telephoto Zoom Lens — reach distant subjects. (affiliate link)
Advanced Quality, Blending And Limits
Resolution And Detail
Generated content is produced at a limited size and then scaled into your selection, so large fills may look softer than the original photo. For a high-resolution file, work in smaller sections, or generate on a lower-resolution copy and add noise and sharpening to match. Check the result at 100 percent and compare the grain pattern with the rest of the picture. The tools in Photoshop noise reduction and Smart Sharpen help to match texture.
Matching Light And Shadow
The fill follows the surroundings but does not understand the light direction as you do. A generated rock may have shadows on the wrong side. Look at shadow direction, contrast and color temperature. Fix issues with a clipped adjustment layer, using layer masks and a curve to blend tone. Generated layers can also be masked so only part of the result shows.
When Traditional Tools Are Better
For small spots and simple textures, the older tools remain faster and keep the original pixels. Use healing and clone tools for blemishes and dust, and Content-Aware Fill when you want a result built only from the existing image. Generative fill is best for large or complex gaps where the picture needs new content.
Faces, Hands And Text
Generated people and hands may have errors, and text often becomes gibberish. Avoid asking for realistic faces and small text. Use it for backgrounds and objects, and treat anything with people as a draft that needs careful checking. In editorial or documentary work, adding or removing elements may break rules about image honesty, so know the standards of your client or publication.
Disclosure And Metadata
Photoshop can attach content credentials that record that AI tools were used. Some contests, agencies and stock libraries restrict AI-generated areas or require disclosure. Read the submission rules before you use generative edits on work you plan to enter or sell.
A Reliable Workflow
- Duplicate the image or work on a Smart Object layer so you can return to the original.
- Make a precise selection with Select Subject or the Quick Selection tool, then expand it by a few pixels.
- Generate three to six variations and choose the one with the cleanest edges.
- Refine with masks, a soft brush and tone matching.
- Save a layered file and flatten only for delivery.
The more you treat the output as raw material instead of a finished result, the better your pictures look. Think of it as a very capable assistant that still needs direction and checking.
Try It
- Open a photo with a minor distraction, such as a sign, bin or person at the edge.
- Select the distraction with the Lasso tool and generate with an empty prompt.
- Look at all three variations and pick one, then zoom to 100 percent to check the edges.
- Compare with a result made using Content-Aware Fill or the Clone Stamp.
Common Questions
Is generative fill the same as content-aware fill?
No. Content-aware fill rebuilds an area from pixels in your image, while generative fill creates new content with an AI model and can follow a text prompt.
Does generative fill work offline?
The main feature runs through Adobe servers, so you need an internet connection and a signed-in account. Check your plan for the credit allowance.
Can I use a prompt to add people?
You can try, but faces and hands often look wrong. It is safer to use generative fill for backgrounds and objects and to check any people at full size.
Will it change the rest of my photo?
No. It creates a new layer for the selected area and leaves the original pixels untouched, so you can hide or delete the result.
Related Lessons
- Content-Aware Fill for filling from existing pixels.
- Healing And Clone Tools for small repairs that keep original detail.
- Layer Masks In Photoshop to blend generated areas smoothly.
- Photoshop Selection Tools for cleaner selections before generating.
- Smart Objects to keep edits flexible and reversible.
Gear That Helps With This
Hand-picked kit that makes this lesson easier to put into practice.
Some links are affiliate links: if you buy through them we may earn a small commission at no extra cost to you. How this works.