
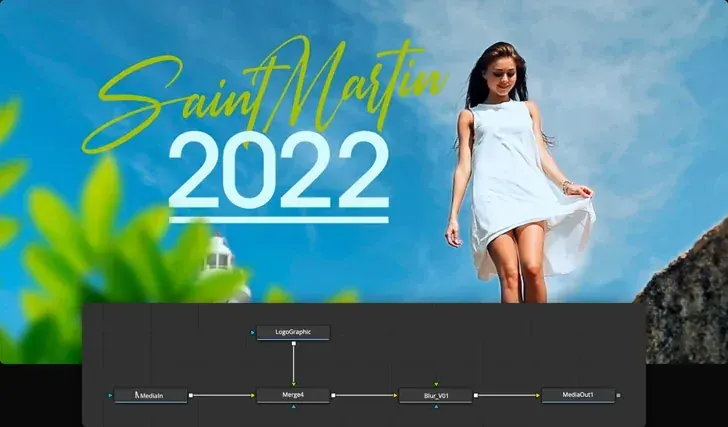
Resolve Fusion is the node-based visual effects and motion graphics page inside DaVinci Resolve. Instead of stacking layers on a timeline, you connect nodes in a flow, where each node performs one task such as masking, blurring or merging, and the result moves from the media input to the output.
Why It Matters
Fusion lets you do compositing, titles, tracking and cleanup without leaving Resolve, so footage never needs a round trip to another application. For editors who occasionally need a sign removed or a title animated, it is the quickest route to a polished result.
Node-based thinking is also common in professional visual effects and color work. Once you understand a node tree, you can follow the logic of almost any compositing program.
Beginner Resolve Fusion Basics For New Users
Open the Fusion page with a clip selected on the timeline. You see two viewers on top, a node area at the bottom and an inspector on the right. The clip arrives as a MediaIn node and leaves through a MediaOut node. Everything you add sits between them, joined by lines that show the flow of the image from left to right.
The Main Parts Of The Page
- Viewers show the current node output; you can load any node into the left or right viewer for comparison.
- The node area is the flow, where you add, connect and disconnect tools.
- The inspector shows the controls for the selected node, such as size, blur amount or color.
- The timeline strip at the bottom of the page shows keyframes and the clip range.
- The spline and keyframe editors adjust animation curves, much like graph editors in other programs.
Nodes You Will Use First
| Node | What It Does | Typical Use |
|---|---|---|
| Merge | Places a foreground over a background | Adding text, logos or cutouts |
| Background | Creates a solid color or gradient | Backdrops and color cards |
| Text+ | Generates editable, animatable text | Titles and lower thirds |
| Transform | Moves, scales and rotates an image | Positioning and simple animation |
| Polygon or Ellipse mask | Defines a shape to reveal or hide an area | Isolating part of the frame |
Build A Simple Title Effect
- Place a clip on the Edit page, select it and open the Fusion page.
- Right-click the node area, choose Add Tool, then Text+, and type your title in the inspector.
- Connect the Text+ output to the foreground input of a Merge node, and the MediaIn output to the background input.
- Send the Merge output to MediaOut and check the result in the viewer.
- Add keyframes to the Transform node of the text so it slides or fades in over the first second.
Common Mistakes
- Connecting a node to the wrong Merge input, which swaps foreground and background.
- Forgetting that the viewer shows the loaded node, not the final output, and then wondering why the edit looks different.
- Building effects in Fusion for simple titles that the Edit page can do faster.
- Leaving heavy effects uncached so playback stutters.
A Worked Example
Suppose you have a short clip of a street sign with a car moving behind it, and you want the sign text to be replaced by a new title. Open Fusion, add a Text+ node, merge it, then use a planar tracker on the sign so the text follows the sign as the camera moves. Even a first attempt shows how nodes break a large job into small, visible steps.
Quick Reference
Remember three rules. Image flows left to right through the nodes, the Merge node decides which input sits on top, and the viewer shows only the node you loaded into it. When something looks wrong, click each node in turn to find where the problem first appears.
When To Use Fusion Instead Of The Edit Page
Use the Edit page for simple titles, fades and transforms, since they are faster to build and easier to change. Switch to Fusion when an effect needs more than one layer interacting, such as tracking a graphic onto a moving surface, building a custom lower third with animated shapes, removing a small object, or combining several masks. Keeping simple jobs on the Edit page and complex jobs in Fusion saves time and keeps projects easier to hand to another editor later.
Keeping A Tree Readable
Name nodes clearly, for example Title Text or Sign Track, because default names such as Merge1 and Merge2 become confusing in larger trees. Group related nodes, add sticky notes for reminders, and keep the flow tidy from left to right. A clean tree is much easier to revisit months later or to explain to a client who asks for a change.
Handy for this: Macro Lens — fill the frame with detail. (affiliate link)
Advanced Working Faster And Smarter In Fusion
Compositing And Alpha
Every node passes color and, where it exists, an alpha channel that defines transparency. Understanding whether an image is straight or premultiplied prevents dark or bright fringes around cutouts. A Merge node assumes premultiplied foregrounds by default, so if edges look dirty, an Alpha Divide or Alpha Multiply node can fix the mismatch. This is the same principle that drives masks and blending in After Effects.
Tracking And Stabilization
Fusion includes a planar tracker and a point tracker. Tracking a surface lets you attach a replacement screen, a sign or a patch to moving footage. Good tracks need contrast and detail, and a long clip often tracks better when split into sections. The ideas match motion tracking in After Effects, though the node layout differs.
Performance And Caching
Heavy nodes such as blur, glow and particle effects slow playback. Enable the node cache or render the Fusion page to cache so you can scrub smoothly. Lower the viewer proxy quality while building the tree, and increase it only for final checks. Proxy and cache settings matter even more on laptops with limited video memory.
Fusion Clips And Reusable Setups
A Fusion composition lives inside a Fusion clip, so it travels with the timeline and can be copied between projects. For reusable looks, save a macro or template, which wraps a group of nodes into a single tool with only the controls you choose. Repeat tasks stay consistent across a project, and you rarely rebuild the same tree twice. Before committing to heavy tracking and noise tools, compare the free and Studio editions, and learn the timeline side in the Resolve Edit page lesson.
Try It
- Select any clip in the Edit page and open the Fusion page.
- Add a Text+ node and merge it over the footage with a Merge node.
- Animate the text position with two keyframes on a Transform node.
- Add a Rectangle mask to the footage and blur the background outside it.
Common Questions
Is Fusion included in the free version of Resolve?
Yes, the Fusion page is included in the free version. The Studio edition adds some advanced tools such as additional noise reduction and certain effects.
Do I need to learn nodes to use Fusion?
Yes, but a few nodes cover most work. Merge, Transform, Text+, Background and a mask are enough to build many effects.
Is Fusion the same as After Effects?
They solve similar problems, but Fusion is node-based and After Effects is layer-based. Both can track, mask and animate; the workflow feels different.
Why does my Fusion comp play slowly?
Heavy nodes, high resolution and no caching all slow playback. Lower the viewer quality, cache the page and simplify the node tree while you work.
Related Lessons
- Resolve Edit Page Basics for the timeline where Fusion clips live.
- Resolve Color Nodes to compare node logic on the Color page.
- Motion Tracking In After Effects for the layer-based way of attaching elements.
- Masks And Blending In After Effects for related cutout ideas.
- Resolve Free Vs Studio to see which Fusion tools need Studio.
Gear That Helps With This
Hand-picked kit that makes this lesson easier to put into practice.
Some links are affiliate links: if you buy through them we may earn a small commission at no extra cost to you. How this works.