
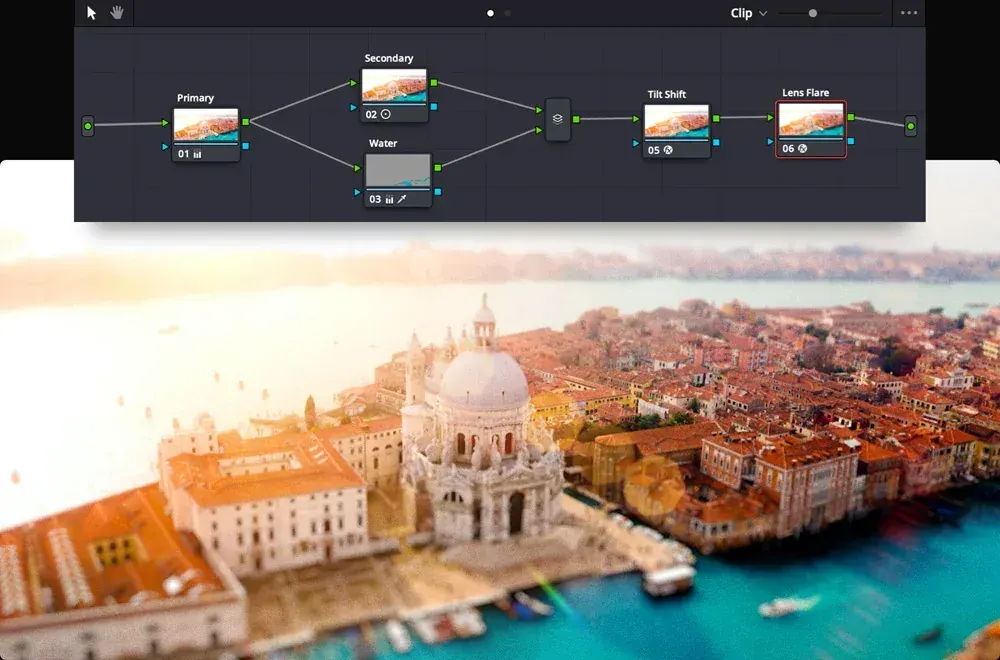
Resolve color nodes are the building blocks of grading on the DaVinci Resolve color page. Each node holds a set of adjustments, and nodes connect in a tree, so you can separate exposure, white balance, secondary corrections and looks into independent steps that are easy to change, reorder or turn off.
Why It Matters
Many editors use layers or a single stack of sliders. Resolve uses nodes instead, which makes it possible to build complex grades while keeping each correction isolated. You can see exactly which node does what, disable one to compare, and copy a node tree between clips.
This structure also reflects the way colorists work. Corrections are applied in an order, and the order affects the result. A node tree makes that order visible.
Beginner How Resolve Color Nodes Work
Click the Color tab to open the color page. The viewer sits at the top, the node graph at the right, and the tools at the bottom, including color wheels, curves and scopes.
Main Parts Of The Color Page
| Area | Purpose |
|---|---|
| Viewer | Shows the current frame and grade |
| Node graph | Displays the tree of corrections |
| Color wheels | Adjust lift, gamma, gain and offset |
| Curves | Shape contrast and color |
| Scopes | Waveform, parade and vectorscope for accurate judgment |
| Gallery | Stores stills and looks to compare and reuse |
Creating Nodes
- Select a clip on the color page. It begins with one node.
- Press Alt and S to add a serial node after the current one.
- Press Alt and P to add a parallel node that blends with the others.
- Press Alt and L to add a layer node.
- Use Ctrl and D to disable a node and compare the effect.
A Simple Grading Order
- Node 1: correct exposure and contrast using the primary wheels.
- Node 2: fix white balance and color cast.
- Node 3: match skin tones or adjust a specific color with a secondary.
- Node 4: add the creative look or a LUT.
- Node 5: finishing touches such as vignette or sharpening.
Common Mistakes
- Doing everything in one node, which makes later changes difficult.
- Applying a LUT before correcting exposure, so the look behaves unpredictably.
- Judging color without scopes, then finding clips do not match.
- Adding too many nodes with no labels, so the tree becomes confusing.
A Quick Practice
Open a clip, add three serial nodes, and name them Exposure, Color and Look. Adjust each separately, then toggle them on and off to see the effect of each step.
Handy for this: Monitor Calibrator — colors you can trust. (affiliate link)
Advanced Node Types, Qualifiers, Color Management And Matching
Serial, Parallel And Layer Nodes
Serial nodes pass the image from one to the next, so each node affects the result of the previous. Parallel nodes process the original image separately and blend the outputs, which is useful for combining several adjustments without stacking them. Layer nodes work like layers with blend modes and opacity. Choosing the type depends on whether the correction should build on previous work or be independent.
Primaries And Secondaries
Primary corrections change the whole image, using lift, gamma, gain and offset wheels or the log wheels. Secondary corrections isolate part of the image using qualifiers, power windows or masks, and then adjust only that area. For example, you can qualify the sky by color and make it deeper blue, or draw a window around a face to brighten it. See color grading basics and luminance range masks.
Color Management And Working Space
Resolve can manage color for you using its color science settings. Declaring the input color space and the output space allows the program to convert between them, and nodes then work in a consistent space. This matters with log footage, which needs a transform before grading. Read Resolve color management, log footage and color spaces compared. Using LUTs in a node is covered in LUTs explained.
Matching Shots
Use scopes to compare clips. The waveform shows brightness, the parade shows channel balance, and the vectorscope shows hue and saturation, with a line marking skin tones. Grab a still from a reference clip, split screen it against the current clip, and adjust until they match. Shot matching is easiest when the footage was shot with consistent settings. See video scopes and camera calibration.
Copying And Reusing Grades
Select a clip with a finished grade, then middle click on another clip to apply the grade, or use the gallery to save a still with its grade. Create a group so that clips from the same scene share a pre-clip grade, which acts as a starting point for all clips in the group. Keep node labels clear so another editor can read your work.
Where It Fits In The Edit
Resolve’s pages share one project, so edits you make on the edit page appear on the color page. See the Resolve edit page for assembling a timeline first. For other editors, compare approaches in Lumetri color basics.
Naming, Organizing And Keeping Trees Tidy
Right click a node and choose Node Label to give it a name. Clear names such as Exposure, Skin, Sky and Look let you find a correction instantly, even months later. Keep the tree flowing left to right, and avoid long chains of identical nodes. If a grade becomes complicated, collapse related corrections into a compound node, or use groups to share the early steps across a scene.
A Worked Example: Fixing A Dull Interview
Suppose a clip looks flat and slightly green. In node one, raise gain until the waveform reaches near the top, and lower lift until blacks sit just above the bottom. In node two, use the parade to balance the channels, reducing green until the tops line up. In node three, qualify the skin with the eyedropper, soften the qualifier, and nudge the hue toward the skin line on the vectorscope. In a fourth node, apply a gentle contrast curve for finish. Each step can be toggled on and off to show the improvement.
Performance Tips
Complex trees with many windows and noise reduction nodes can slow playback. Cache the clip, lower the timeline playback resolution while grading, and apply heavy effects such as noise reduction last. Using proxy media or optimized files can also help. If you work on a modest computer, grade at half resolution and check the final result at full size.
Try It
- Open a clip on the color page and add serial nodes for exposure, color and look.
- Use the scopes to set exposure so the waveform sits within range.
- Add a parallel node and tint the shadows slightly cooler.
- Save a still to the gallery and apply the grade to another clip from the same scene.
Common Questions
What is a node in DaVinci Resolve?
A node is a container for color adjustments on the color page. Nodes connect in a tree, so you can organize and change corrections independently.
What is the difference between serial and parallel nodes?
Serial nodes apply one after the other, so each affects the previous result. Parallel nodes process the same input separately and blend the results.
How many nodes should I use?
Use as many as you need to keep corrections organized, often three to eight for a typical shot. Avoid piling everything into one node.
Can I use LUTs with nodes?
Yes. Apply a LUT in a dedicated node, usually near the end of the chain, so you can adjust the correction before it and compare with and without the look.
Related Lessons
- Resolve Color Management to set up a reliable working space.
- Color Grading Basics for the principles behind the nodes.
- Video Scopes to judge color and exposure accurately.
- LUTs Explained for applying looks and conversions.
- Resolve Edit Page Basics to build the timeline before grading.
Gear That Helps With This
Hand-picked kit that makes this lesson easier to put into practice.
Some links are affiliate links: if you buy through them we may earn a small commission at no extra cost to you. How this works.