
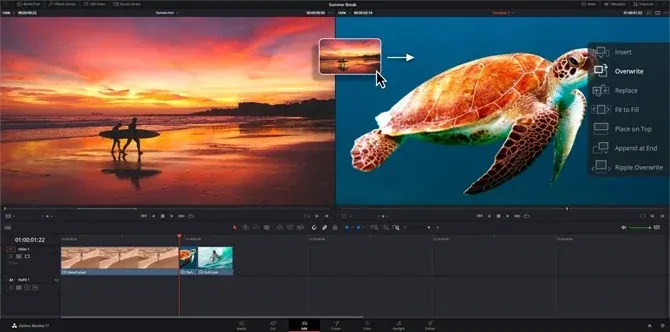
The DaVinci Resolve edit page is the main workspace for assembling clips into a timeline, with a media pool on the left, source and timeline viewers in the center, and tracks below. You import footage, mark the parts you want, place them on the timeline, trim them and add transitions and titles before moving to color or audio.
Why It Matters
Resolve is a large program with separate pages for media, cutting, editing, Fusion effects, color, audio and delivery. Beginners often wander between them. Understanding the edit page gives you a home base where most of the story is built, and the other pages then become refinements of that work.
It also teaches habits that transfer to every editor: setting the timeline rate correctly, working with marks, using shortcut keys and keeping the project organized. These save hours across a year of editing.
Beginner A First Tour Of The DaVinci Resolve Edit Page
Click the Edit tab at the bottom of the screen to open the page. Resolve arranges it into regions that you can resize and hide.
The Main Areas
| Area | Purpose |
|---|---|
| Media Pool | Bins that hold imported clips, timelines and stills |
| Source Viewer | Plays a clip so you can mark the part you want |
| Timeline Viewer | Shows the edit in progress |
| Timeline | Tracks where clips, audio, titles and effects are arranged |
| Inspector | Controls transform, crop, speed, audio and more for the selected clip |
| Effects Library | Transitions, titles, generators and filters |
Cutting A Simple Sequence
- Create a project and set the timeline resolution and frame rate in Project Settings.
- Import footage into the Media Pool using File, Import Media or by dragging from a folder.
- Double click a clip to open it in the Source Viewer, then press I to mark the in point and O to mark the out point.
- Drag the clip to the timeline, or use the Insert or Overwrite buttons above the viewer.
- Repeat for each shot, then play with the spacebar to watch the sequence.
Tools And Shortcuts To Learn First
- A for the selection tool and B for the blade tool that cuts a clip.
- N to turn snapping on or off, so clips jump to edges and the playhead.
- J, K and L to play backward, pause and play forward, pressing again to speed up.
- Ctrl and the plus or minus keys to zoom the timeline in and out.
- T for trim edit mode, which opens ripple, roll, slip and slide edits.
Common Mistakes
- Starting a timeline at the wrong frame rate, which cannot easily be changed once clips are added.
- Dragging clips from the source viewer when you only meant to mark a range.
- Leaving snapping off and leaving small gaps between clips.
- Forgetting to save, and not enabling auto save in Preferences.
A Five Minute Exercise
Import three clips and choose the best two seconds of each by setting in and out points. Place them one after another, add a cross dissolve between them by dragging it from the Effects Library, and adjust the length of the dissolve by dragging its edge. You have used nearly every region of the page.
Handy for this: Pen Tablet — precise retouching. (affiliate link)
Advanced Timeline Settings, Trimming Methods And Organization
Timeline Resolution And Frame Rate
Open Project Settings and look under Master Settings for Timeline Resolution and Timeline Frame Rate. Choose the delivery format, and set the playback frame rate to match. The frame rate can be locked once a timeline contains clips, so confirm it first. For choosing a rate, see video frame rates and 24p versus 60p. If you use the free version, remember that it limits output to Ultra HD at up to 60 frames per second, as discussed in Resolve free versus Studio.
Trimming With Precision
Pressing T enables trim mode. A ripple trim changes the length of one clip and moves everything after it. A roll trim moves the cut point between two clips without changing total length. A slip changes which part of a clip is visible without moving it on the timeline, and a slide moves a clip while its neighbors adjust. Dynamic trim, with the W key, lets you trim while playing. Mastering these edits is as important as the blade tool. Compare the concepts with Premiere trim tools.
Organizing With Bins And Metadata
Make bins for footage, audio, graphics and timelines, and use color flags and keywords to mark selects. Smart bins gather clips by rules such as camera, flag or keyword, in the same spirit as smart collections for photos. Naming timelines with version numbers prevents confusion when you duplicate a timeline before a big change.
Sync, Multicam And Audio
On the edit page, you can sync separate audio to video using waveform sync, or link clips into multicam angles for interviews and events. Use the Fairlight page for deeper audio work, described in Resolve Fairlight. When using sound recorded separately, a slate or clap helps, as covered in syncing audio with a clapper.
Proxies And Performance
If playback is choppy, generate proxy media or use optimized media, and lower the timeline playback resolution from the Playback menu. Proxy files are small copies used for editing, and Resolve relinks to the original files for color and delivery. A fast drive for cache and media matters as much as the processor. For related approaches in another editor, read Filmora proxy editing.
Moving On To Color
After picking the cut, switch to the Color page to correct and grade each shot, using the node system described in Resolve color nodes. Because all pages share one timeline, changes on the edit page, such as trimming a clip, show up in color and delivery automatically.
Try It
- Create a new project and set the timeline to 1920 by 1080 at 24 frames per second.
- Import five clips, mark an in and out point on each, and insert them into the timeline.
- Use the blade tool to cut one clip in half, then use a ripple delete to close the gap.
- Add a dissolve between two clips, play it back, and save the project.
Common Questions
What is the difference between the Cut page and the Edit page?
The Cut page is a faster, simplified layout for quick edits with a dual timeline, while the Edit page is a full traditional layout with more tracks and controls. Both work on the same timeline, so you can switch between them.
How do I add a transition in DaVinci Resolve?
Open the Effects Library, find Video Transitions, and drag a cross dissolve or another transition onto the cut between two clips. Adjust its length by dragging its edge, or double click for the duration.
Can I change my timeline frame rate later?
It is difficult once clips are on the timeline. Create a new timeline with the correct frame rate in its settings and copy your clips into it, or start the project again.
Is the free version good enough for editing?
Yes for most projects. The free version includes the full edit page, color, Fusion and Fairlight with some limits on resolution, certain effects and codecs.
Related Lessons
- Resolve Color Nodes for grading after the cut.
- Resolve Fairlight for cleaning and mixing audio.
- Resolve Free Vs Studio to see what the paid version adds.
- Premiere Timeline Basics to compare with another editor.
- Video Frame Rates for picking the right timeline setting.
Gear That Helps With This
Hand-picked kit that makes this lesson easier to put into practice.
Some links are affiliate links: if you buy through them we may earn a small commission at no extra cost to you. How this works.