
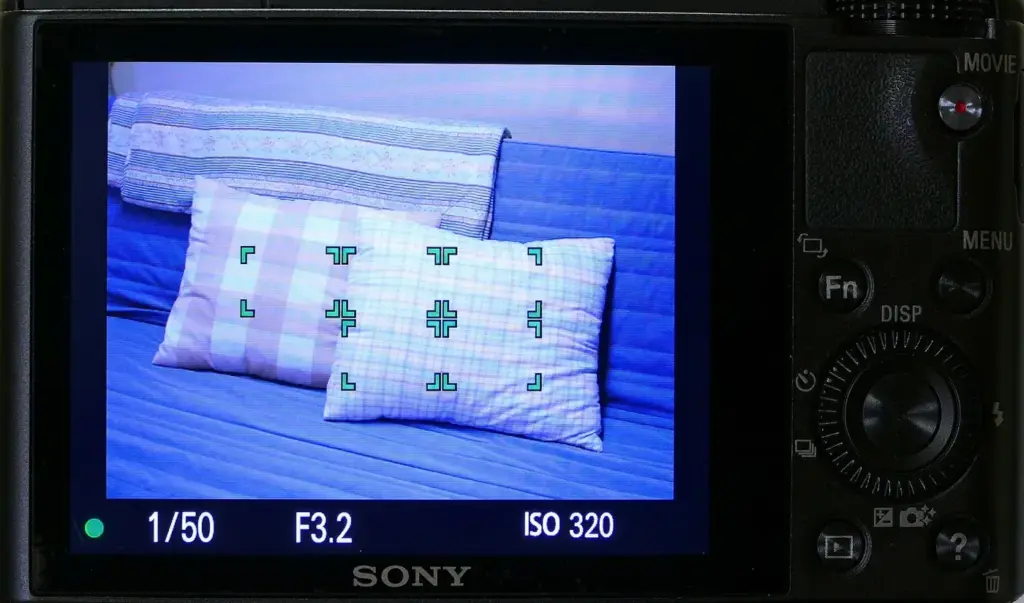
Autofocus area modes control how much of the frame the camera searches when it focuses. A single point looks at one small spot you choose. A zone or group searches a larger patch, wide area modes search nearly the whole frame, and tracking modes follow a subject as it moves. Pick the size that matches how predictable your subject is.
Why It Matters
Focus is only useful if the camera focuses on the right thing. An area mode that is too small forces you to aim precisely, and one that is too large lets the camera pick the nearest or highest-contrast object, often the wrong one.
Matching the area to the subject is one of the simplest ways to improve your keeper rate. It costs nothing and takes a few seconds to change once you know the options.
Beginner A Plain-Language Introduction To Autofocus Area Modes
Every camera has a grid or cloud of focus points. The area mode decides which of those points are used. The names differ by brand, but the idea is the same everywhere, on DSLR and mirrorless bodies alike.
| Mode | What The Camera Uses | Best For |
|---|---|---|
| Single point | One point you place | Still subjects, portraits, macro, precise control |
| Expanded point (one point plus neighbors) | Your point and a few around it | Slightly moving subjects, small shifts |
| Zone or group | A block of points | Players, children, birds against clear sky |
| Wide or auto area | Nearly all points | Quick snapshots, unpredictable action |
| Tracking | A point that moves with the subject | Moving subjects in a busy frame |
Single Point
You move one small box over the subject, usually the nearest eye for a portrait. The camera ignores everything else in the frame. It is the most precise option, and the most dependable if the subject is still. The cost is that you must keep that point on the subject. If a person moves a hand-width, the point may fall onto the background.
Zone Or Group
A zone covers a rectangle or cluster of points. You place it near the subject, and the camera picks whichever point in the zone is best, often the closest object. This is a friendly option for a moving child or a bird against the sky, because you only have to keep the zone roughly on target.
Wide Area
The camera uses the whole frame and picks the subject itself, usually favoring what is closest or faces it detects. This is easy to use and good for a quick shot, but it can choose a branch in front of your subject. Pair it with face or eye detection to make it more reliable.
Tracking
You place a target on the subject, press the shutter button halfway or a rear button, and the camera follows that subject as it moves across the frame. Cameras use color, shape and distance to keep the lock. It works best with a subject that stands out from its background.
Steps To Try
- Set the camera to continuous autofocus so tracking modes can follow movement, see continuous autofocus.
- Set a single point and photograph a still subject with an off-center position.
- Switch to a medium zone and photograph a moving person.
- Switch to wide area with subject detection on and compare how often the right thing is sharp.
Common Mistakes
- Using wide area with a distracting foreground and getting a sharp branch and a blurred face.
- Using a single small point on a fast subject and losing it.
- Leaving the point where the last photo needed it, then framing the next scene with the point outside the subject.
- Not knowing the shortcut to move the point quickly. Use a joystick, touch screen or touchpad.
Handy for this: Wide-Angle Zoom Lens — take in the whole scene. (affiliate link)
Advanced Tuning Area Size To Subject Speed, And Combining Areas With Subject Detection
The Size Rule
The faster and less predictable the subject, the larger the area should be. The slower and more predictable it is, the smaller. Your skill matters too. A smaller area demands better aim, a larger area demands better trust in the camera. A good starting set is single point for a still subject, small zone for a walking subject, large zone for a fast subject with a clean background, and tracking for a subject with a busy background.
Why Cluttered Backgrounds Break Large Areas
Autofocus depends on contrast and distance. A larger area makes the camera see more possible subjects, and most algorithms favor the closest one or the one with the highest contrast. That is why a bird in a tree with branches in front can lose focus to the branches, and why a large area may focus on the net in a tennis match. A smaller area or a tracking lock stops that.
Subject Detection Changes The Rules
Newer cameras identify people, animals, birds, vehicles and more, and then choose the eye, face or body inside the area. You can set a wide area and let detection pick the subject, or a zone to tell the camera where to look and let detection choose the best part inside. When detection fails, the camera falls back to the area you set, so the area still matters. See subject detection autofocus and eye autofocus.
Edge And Corner Points
Points near the corners may be less sensitive or work with fewer lens apertures than central points, especially on DSLRs. Cross-type points near the center detect detail in both directions, while linear points near the edge detect one. Mirrorless cameras cover most of the frame with similar sensitivity, see on-sensor autofocus. Check how your body behaves in low light at the edges.
Linking Points To Orientation
Some cameras can remember different focus point positions for vertical and horizontal shots. This saves time when you rotate for a portrait orientation. Turn it on if the camera has it.
Fast Switching
Assign a button to cycle through area modes. Many professionals keep a single or small area on one button and a larger tracking mode on another, so they change at the moment the subject changes. Custom buttons are covered in custom buttons. If you pair this with back-button focus, you can change area, lock and track with one hand.
Try It
- Set a single point and photograph a portrait with the point on the nearest eye.
- Switch to a zone and photograph a pet or person walking.
- Switch to wide area with subject detection on and photograph two people at different distances. See which one is sharp.
- Photograph a subject behind branches or a fence in single point and in wide area. Compare.
Common Questions
Which autofocus area mode is best?
None is best for everything. Single point suits still subjects and precise work, zone suits moving subjects, wide area suits fast snapshots, and tracking suits subjects that move across a busy frame. Match the size to how predictable the subject is.
What is the difference between zone and wide area?
A zone uses a block of focus points that you place. Wide area uses nearly the whole frame and lets the camera choose. Zone gives you more control, while wide area gives you less effort.
Why does my camera focus on the background?
The area may be too large, or the point may sit beside the subject. Use a smaller area, move the point onto the subject, or switch to tracking or subject detection so the camera knows what to follow.
Do I need to change area modes often?
Not very. Many photographers keep one or two favorites and switch when the subject changes. Assigning a custom button makes a change quick enough to use while shooting.
Related Lessons
- Continuous Autofocus to follow subjects that move.
- Subject Detection Autofocus to let the camera pick the subject for you.
- Eye Autofocus for sharp portraits with less effort.
- Back-Button Focus to control focus separately from the shutter.
- Focus And Recompose to learn the old technique and its limits.
Gear That Helps With This
Hand-picked kit that makes this lesson easier to put into practice.
Some links are affiliate links: if you buy through them we may earn a small commission at no extra cost to you. How this works.