
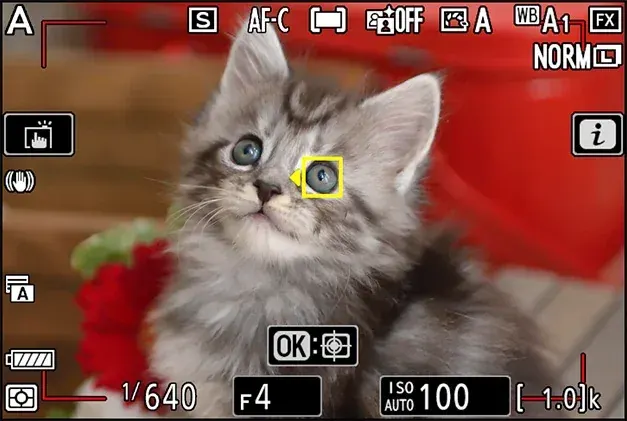
Eye autofocus is a camera feature that finds a face, locks onto the nearest eye and keeps it sharp as the subject or photographer moves. It removes most of the guesswork from portrait focus, especially at wide apertures where depth of field is only a few millimeters thick.
Why It Matters
Sharp eyes decide whether a portrait works. Viewers look at the eyes first, and a portrait with sharp ears and soft eyes reads as a miss. At f/1.4 or f/1.8 the in-focus zone at portrait distance is thinner than a nose, so focus and recompose or a single manual point often fail.
Eye autofocus turns this from a skill problem into a setup problem. If you set it up once and learn where it breaks, you can keep your attention on expression and light.
Beginner Turning On Eye Autofocus And Choosing The Right Eye
Most current mirrorless cameras from Sony, Canon, Nikon, Fujifilm, Panasonic and OM System offer eye detection, and many DSLRs offer a weaker version in live view. The setting often has names like Face and Eye Detection, Eye AF, or Subject Detection set to People.
Basic Setup
- Set the focus mode to continuous autofocus (AF-C or Servo) for moving subjects, or single (AF-S or One Shot) for still ones.
- Choose a wide focus area such as Wide, Zone or Tracking so the camera can search the whole frame.
- Turn on face and eye detection in the focus menu and set it to People.
- Half press the shutter or the AF-ON button. A box should appear on an eye.
- Take the picture when the box is on the eye closest to you.
Which Eye To Choose
The convention is to focus on the eye nearest the camera. If the face is turned, the far eye can look soft while the near eye is sharp, which feels natural. Many cameras let you pick Left or Right eye, or switch with a button or the touchscreen. Use that control when the subject is in three-quarter view.
Settings Worth Knowing
| Setting | What it does |
|---|---|
| Eye priority | Moves the box to an eye instead of the whole face |
| Right or left eye select | Lets you force one eye |
| Face and eye memory | Keeps the first person if others enter |
| Subject switching | Controls how quickly focus jumps to another face |
Common Mistakes
- Leaving the camera in a single small spot area, which prevents the detection from finding the face.
- Shooting at f/1.2 and expecting both eyes sharp from a three-quarter angle.
- Forgetting to cancel eye detection when shooting a product or landscape, so focus jumps to a stray face.
- Pressing the shutter before the box appears, which falls back to normal contrast focus.
A Quick Practice Session
Photograph a friend at f/2 from about 2 meters. Take ten frames while they turn their head from side to side and notice that the focus box follows. Review at 100 percent and count how many eyes are sharp.
Handy for this: Fast Prime Lens — creamy backgrounds, low light. (affiliate link)
Advanced Eye Detection With Masks, Glasses, Wide Apertures And Groups
Glasses, Sunglasses And Masks
Clear glasses usually work well. Strong reflections, thick frames, tinted sunglasses and heavy bangs can confuse the detector. When the eye is not found, many cameras fall back to the face, which lands on the brow or nose. Switch to a small flexible spot on the eye, or ask the subject to tilt their head so the glare moves. Masks that cover the mouth still work because detection relies mainly on the eye region.
Wide Apertures And Depth Of Field
At f/1.4 on an 85mm lens, depth of field at 2 meters is a few centimeters. Even a perfect focus lock can leave one eye soft if the face is angled or the head moves forward between focus and exposure. Stop down to f/2.8 for angled faces, or use f/4 for groups. The relationship between distance, aperture and thickness of focus is covered in controlling depth of field.
Groups And Multiple Faces
With several faces, the camera tends to pick the closest or largest. Subject switching and face registration help, but they are not perfect. A reliable approach is to use a medium aperture such as f/4, choose the person who matters most with the touchscreen, and take bursts. See group photos for arrangement and aperture advice.
Tracking Versus Single Shots
Continuous modes keep refocusing, which can cause hunting if the subject moves out of the box. For walking subjects, tracking with eye detection is ideal. For static portraits, switch to single AF, lock on the eye, and recompose slightly; the shift is small enough that depth of field usually covers it, but a larger shift at a wide aperture may not be safe. For a closer look at moving subjects, read continuous autofocus and subject detection autofocus.
Lens Choice And Working Distance
Eye detection needs enough pixels on the face to work. At very long distances, such as a full-length portrait taken from 10 meters with a short lens, the eyes may be only a few pixels wide and the detector can lose them. Move closer, use a longer lens, or switch to a face or body tracking mode. Fast lenses with quick autofocus motors also help, because the camera can only follow an eye as fast as the lens can move. Telephoto portrait lenses around 85mm to 135mm are a common match for this feature.
Video And Eye Detection
Eye detection works in video as well and is useful for talking head clips and vlogging. Set continuous AF, choose a wide area, and turn on face and eye priority. To avoid focus jumping to someone walking behind the subject, enable face registration or lower the tracking sensitivity. Some cameras also offer a transition speed setting that controls how quickly focus moves between faces, which prevents distracting pulls. See video autofocus for the full setup.
When To Go Manual
Heavy backlight, dark rooms with little contrast and profile shots with a hidden eye can defeat any system. Use magnification and focus peaking on a tripod for deliberate portraits. See focus peaking and magnification.
Try It
- Switch your camera to AF-C with face and eye detection on and a wide focus area.
- Photograph a person at f/2 from 2 meters as they turn slowly from left to right.
- Repeat at f/5.6 and compare how many frames have both eyes sharp.
- Try the same test with glasses on and off to see how detection behaves.
Common Questions
Does eye autofocus work in low light?
It works as long as the camera can see enough detail to detect a face. In very dim light it may hunt or lose the eye. Use a wider aperture, brighter modeling light, or an assist lamp, and switch to a single spot if it struggles.
Can eye autofocus track animals?
Many newer cameras detect pets and wildlife, including eyes of dogs, cats and birds, under Subject Detection. Older cameras handle people only. Check the focus menu for an Animal or Bird option.
Why is the wrong eye in focus?
The camera picked the eye it judged closest or largest. Select left or right eye manually, or use the touchscreen to choose the eye you want before pressing the shutter.
Do I still need back button focus?
It helps. Assigning focus to a rear button lets you start eye tracking when you want and stop it when you compose, which prevents focus from jumping after you press the shutter. See back button focus.
Related Lessons
- Continuous Autofocus to understand how tracking updates focus.
- Subject Detection Autofocus for people, animals and vehicles.
- Back Button Focus to separate focusing from the shutter.
- Portrait Focal Length to pair eye detection with the right lens.
- Controlling Depth Of Field to choose apertures that keep both eyes sharp.
Gear That Helps With This
Hand-picked kit that makes this lesson easier to put into practice.
Some links are affiliate links: if you buy through them we may earn a small commission at no extra cost to you. How this works.