
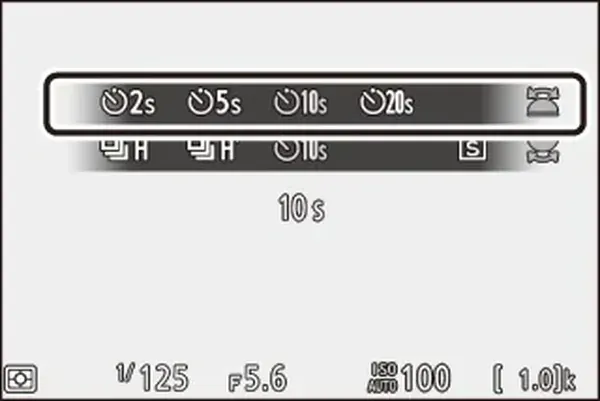
A camera self timer delays the shutter release by a set number of seconds after you press the button. This lets you step into the picture, or lets vibration from your finger fade before the exposure starts. Many cameras also offer remote releases and interval shooting for long exposures and time-lapse sequences.
Why It Matters
Pressing the shutter button shakes the camera slightly, and on a tripod with a slow shutter speed that shake blurs the picture. A delayed release removes it for free.
The same tools help with group portraits, self portraits and time-lapse work, so they are among the most useful controls to learn on any camera.
Beginner Camera Self Timer For Beginners
Look for a drive mode or self-timer symbol on the camera dial or in the menu. It often looks like a small clock or a person with a dotted line. Choose a delay, then press the shutter button, and the camera counts down before taking the picture.
Common Delay Options
| Delay | Best Use |
|---|---|
| 2 seconds | Tripod shots, to let vibration settle |
| 5 seconds | Quick group or selfie portraits |
| 10 seconds | Getting into a group picture or running to a position |
| Custom or multiple shots | Taking several pictures in a row after the delay |
Using The Self Timer For Sharpness
- Mount the camera on a tripod and compose the shot.
- Choose a two-second self timer.
- Turn off image stabilization on the lens if your camera or lens manual suggests it for tripods.
- Press the shutter button and let go.
- Wait for the shot to finish before touching the camera.
Using It For Group And Self Portraits
Frame the shot with a stand-in, press the shutter, then move into position. Use a ten-second delay for a group or a five-second delay for a quick selfie. Many cameras let you take several shots in sequence after one press, so you can try different expressions. Use focus on a stand-in or a marker, or use face detection to follow you.
Remote Releases
- Wired remotes plug into the camera and give a vibration-free release.
- Wireless infrared remotes work at short range with a line of sight.
- Bluetooth and Wi-Fi apps on a phone can release the shutter and show live view.
- Some cameras have a smartphone app with a timer and a bulb release.
Common Mistakes
- Touching the camera during the countdown.
- Forgetting to focus before running into the picture.
- Using a very long timer when a short one would do.
- Leaving the timer on and wondering why the next shot has a delay.
Habit To Build
Whenever the camera is on a tripod, switch to the timer or remote without thinking about it. It takes a moment and prevents blur you cannot fix in editing.
Handy for this: Carbon Fiber Tripod — sharp at slow shutter speeds. (affiliate link)
Advanced Remote Control, Intervals And Long Exposures
Mirror Lockup And Exposure Delay
On a DSLR, the mirror flipping up causes vibration just before the exposure. A self-timer or a mirror lockup mode raises the mirror first and then waits before opening the shutter. Mirrorless cameras have no mirror, but some have shutter shock from the first curtain, and an electronic first curtain or electronic shutter avoids it. The details are explained in electronic shutter and stabilization on tripod.
Bulb Mode And Remotes
For exposures longer than the camera allows, such as 30 seconds, use bulb mode with a remote release. Press once to open the shutter and again to close it, or use a lockable remote that holds the shutter open. Some cameras include a built-in bulb timer so you can set the length ahead of time. These tools are important for star trails, light painting and night scenes as in star trails and light painting.
Interval Shooting
An intervalometer takes a picture at a set interval for a set number of frames. Many cameras have it built in, with settings for start time, interval, number of shots and sometimes exposure smoothing. Use it for time-lapse sequences, as covered in time-lapse photography, and for tracking slow change such as plant growth or construction. Plan the interval from the length of your final clip and the speed of the change.
Settings To Check
- Set the exposure in manual mode so the brightness does not flicker between frames.
- Turn off autofocus after focusing so the lens does not hunt.
- Use a fully charged battery or an external power source for long sequences.
- Use a card with enough space and a good write speed, as in SD card speed.
- Disable long exposure noise reduction if you want to keep the interval short.
Wireless Control And Apps
Phone apps can show a live view, change settings and release the shutter from a distance. They also make it easier to use focus stacking, bracketing and timers. Keep the phone and the camera close, and check how much battery the connection uses. Learn about the connection options in camera to phone transfer.
Troubleshooting
If the timer does not start, check that the drive mode is set and the camera is not in a mode that disables it, such as burst. If shots are blurred even with the timer, the support may be moving, the wind may be shaking the camera or the shutter speed may be too slow for the subject. If the interval shots stop early, check battery, card space and the shutter speed against the interval. The interval must be longer than the exposure plus processing time.
A few extra seconds of planning make a big difference. Test the setup at home, count how many frames the card can hold and confirm that the battery lasts for the whole sequence before you head out.
Combining Timer Modes
Some cameras allow you to combine a delay with bracketing or with a burst of several frames. This allows exposure bracketing for HDR with no touching, and several frames for focus stacking. Check the menu for a timer with multiple shots, and set the camera to a continuous drive mode where available.
Try It
- Place your camera on a tripod or a stable surface and set a two-second timer.
- Take a photo with a slow shutter speed, such as a quarter second, using the timer.
- Take another by pressing the shutter button directly and compare the sharpness at 100 percent.
- Try a ten-second timer to take a picture that includes you.
Common Questions
Does a self timer really improve sharpness?
Yes, for tripod shots at slow shutter speeds. It removes vibration from your finger, which matters most in the range from about 1/60 to several seconds.
What is the best delay for tripod work?
Two seconds is usually enough for the camera to settle, and longer delays only waste time.
Can I use my phone as a remote?
Most modern cameras connect to a phone app by Bluetooth or Wi-Fi and allow shutter release, settings changes and live view.
What is an intervalometer?
It is a timer that takes a series of pictures at a set interval. It can be built into the camera or be an external device.
Related Lessons
- Stabilization On Tripod for settings that prevent shake.
- Time-Lapse Photography for using interval shooting.
- Drive Modes And Burst for other release modes.
- Self Portraits for using the timer creatively.
- Choosing A Tripod for a steady support.
Gear That Helps With This
Hand-picked kit that makes this lesson easier to put into practice.
Some links are affiliate links: if you buy through them we may earn a small commission at no extra cost to you. How this works.