
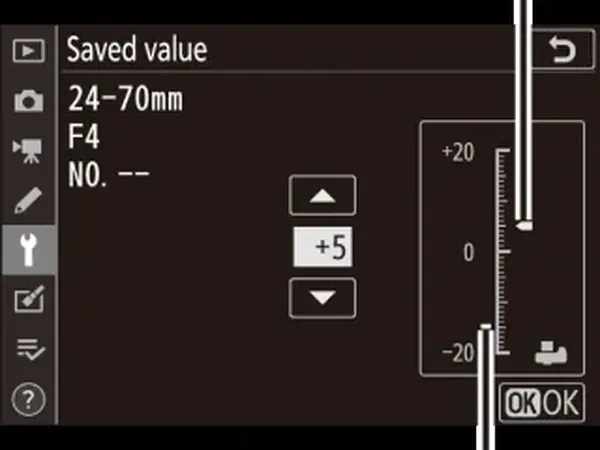
AF micro adjustment is a DSLR camera setting that shifts where the autofocus system places focus for a specific lens, in small steps. It corrects consistent front focus or back focus, where the lens focuses slightly in front of or behind the subject, and the setting is stored per lens or per lens model.
Why It Matters
A DSLR focuses with a separate sensor in the mirror box, and tiny tolerances between that sensor, the mirror and the image sensor can add up. A lens can then focus a little in front of or behind the target, which is most obvious at wide apertures where depth of field is thin.
Calibrating a lens can turn soft portraits into sharp ones, especially with fast primes. Knowing what the setting does also prevents you from adjusting a lens that was never wrong.
Beginner AF Micro Adjustment For Beginners
Front focus means the camera focuses in front of the subject, so the nose is sharp and the eyes are soft. Back focus means it focuses behind the subject, so the ears or background look sharper. If the error is consistent across many shots, a plus or minus offset fixes it. If errors vary from shot to shot, the problem is more likely technique, subject movement or low light, which micro adjustment cannot cure.
What To Know First
- Micro adjustment exists mainly on DSLRs, which use a separate phase detection module.
- Mirrorless cameras focus on the image sensor itself, so they usually need no adjustment.
- Offsets are usually stored per lens, and some cameras store a different value at the wide and tele ends of a zoom.
- The setting is typically found in the menu under AF or custom functions.
- A small error matters most with wide apertures and close subjects.
Symptoms And What They Suggest
| Symptom | Likely Cause | Action |
|---|---|---|
| Same focus miss every time with one lens | Calibration offset needed | Test and set micro adjustment |
| Soft results only at very wide apertures | Shallow depth of field and small error | Test at the widest setting |
| Random misses with all lenses | Technique, shutter speed or AF mode | Check settings before adjusting |
| Sharp at wide end, soft at tele end of zoom | Zoom needs separate values | Adjust wide and tele values |
| Soft overall on a tripod | Lens or camera shake | Check stabilization and shutter speed |
A Simple Test Routine
- Mount the camera on a tripod and set it about 10 to 20 times the focal length from a flat, detailed target at a slight angle, such as a ruler or a focus chart.
- Set the widest aperture, a fast shutter speed and one-shot autofocus with a single center point.
- Focus on the target and take a shot, then refocus each time for every frame, trying several offsets such as -10, -5, 0, +5, +10.
- Zoom in on the images at 100 percent and see which offset places the sharpest part exactly at the focus mark.
- Enter the best value in the menu and repeat a check with a different subject.
Common Mistakes
- Adjusting for a problem caused by camera shake or a slow shutter speed.
- Testing off a tripod or at too small an aperture, where depth of field hides the error.
- Focusing on a shiny, low-contrast or curved target that confuses autofocus.
- Not refocusing between shots, so every image reuses the same focus and tells you nothing.
A Worked Example
A photographer notices portraits taken at f/1.8 are consistently soft on the eyes, with the ears sharper. A test at the widest aperture shows the sharpest point behind the target at offset 0, and sharpest at the target at offset -8. Setting the lens to -8 fixes the problem, and a portrait the next day confirms it. Small steps, a quick retest and a note of the value are all it takes.
Do Not Adjust What Is Not Broken
Many lenses need no change, and some need very little. If a lens test shows sharp results near the center offset, leave it at zero. Over-adjusting a lens you do not need to change can make it worse. If two lenses of the same model need very different values, one may be out of tolerance and might need service from the maker.
Use Live View As A Reference
Live view focus uses contrast detection on the image sensor, which is not affected by the DSLR phase detection module. Focusing in live view with magnification gives you a trustworthy reference. Compare it with the viewfinder shot to see if the lens focuses differently. If both agree, the lens is accurate and no adjustment is needed.
Handy for this: Carbon Fiber Tripod — sharp at slow shutter speeds. (affiliate link)
Advanced Calibration Details And When It Cannot Help
How Phase Detection Creates The Error
A DSLR measures focus using light that passes through a semi-transparent area of the mirror and is bent to a separate sensor. The distance from that path to the main sensor must match precisely. Manufacturing tolerances and temperature can alter it. See phase detection autofocus for how the system works, and why on-sensor autofocus avoids the issue by measuring focus directly at the sensor.
Fast Lenses And Depth Of Field
At f/1.4 on an 85mm lens focused at 6 feet, total depth of field is only a couple of inches, and a small offset error is visible. At f/5.6 the same error disappears inside the depth of field. That is why calibration matters most for fast lenses used wide open, and why testing should be done at the widest aperture. See the 50mm lens lesson for a common example.
Software And Automated Tools
Some cameras offer automatic calibration using live view contrast detection, and third-party software can analyze a test chart to calculate the best offset. These tools save time but still need a good tripod, steady light and a flat target. Verify the result with a real-world shot rather than trusting the number alone, and keep a note of values for every lens.
Other Causes Of Soft Pictures
If calibration does not help, check autofocus area modes, the shutter speed and subject movement. Consider back button focus for a more reliable focus workflow, and check lens motors as explained in lens focus motors. Test results with a clean lens, the correct stabilization setting and the proper focus mode, using the approach in lens testing.
Try It
- Set up a ruler at a 45 degree angle on a table with the camera on a tripod.
- Shoot with the widest aperture at offsets of -10, -5, 0, +5 and +10, refocusing each time.
- Compare the images at 100 percent and find which offset gives the sharpest point at the target.
- Save that value and shoot a real subject to confirm.
Common Questions
Do mirrorless cameras need micro adjustment?
Usually not. They focus on the image sensor, so the lens and the focus system agree. A few models still offer manual correction for adapted lenses.
How do I know if I have front focus?
Test with a ruler at an angle. If the sharpest point is in front of the target mark, you have front focus, and a positive or negative offset, depending on the camera, corrects it.
Should I adjust every lens?
Only if testing shows a consistent problem. Many lenses are accurate enough at the default zero value.
Does the adjustment change with temperature or time?
Small changes can occur, so recheck an important lens before a major shoot or after it has been dropped or serviced.
Related Lessons
- Phase Detection Autofocus to learn why DSLRs need calibration.
- On-Sensor Autofocus for why mirrorless systems avoid the issue.
- Lens Testing for a broader routine to check a lens.
- Fast Lenses to see why wide apertures show errors.
- Back Button Focus for a more reliable focusing workflow.
Gear That Helps With This
Hand-picked kit that makes this lesson easier to put into practice.
Some links are affiliate links: if you buy through them we may earn a small commission at no extra cost to you. How this works.