
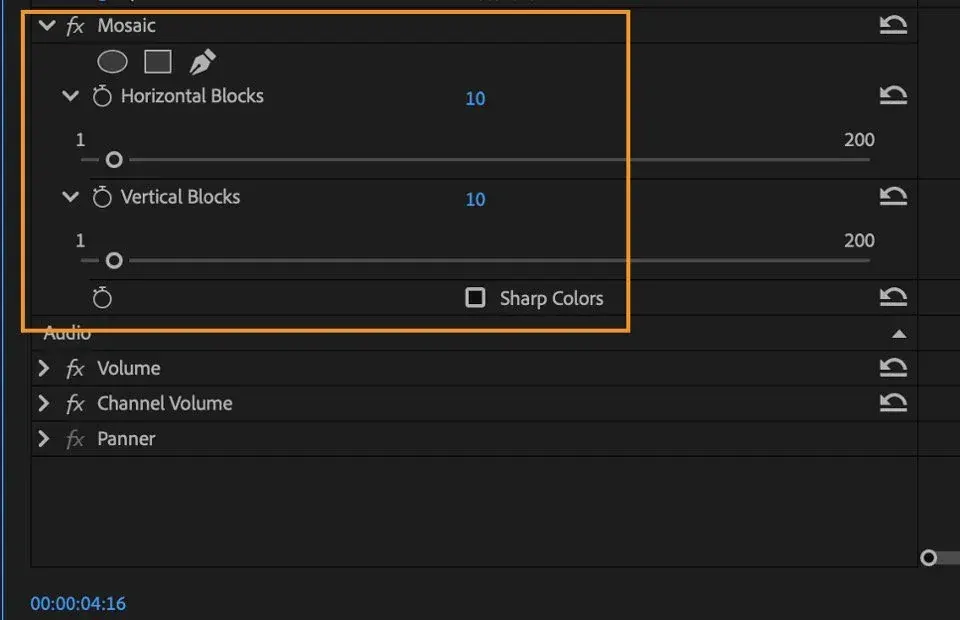
Premiere masking lets you apply an effect to only part of the frame by drawing a shape with the ellipse, rectangle or pen tool in the Effect Controls panel. You can feather the edge, invert the area and then use the tracking buttons so the mask follows a moving subject, keeping an adjustment locked to the right place.
Why It Matters
Most edits need local changes: brightening a face, blurring a license plate or tinting the sky without affecting the ground. Masks make this possible without leaving the editor.
Tracking turns a static mask into one that follows motion, which saves keyframing by hand and keeps the effect convincing as the subject moves.
Beginner Premiere Masking Basics
Select a clip, find an effect in the Effect Controls panel and use the shape icons under it to create a mask. Choose the ellipse, 4-point rectangle or pen tool and draw on the program monitor. The effect now applies only inside the mask, unless you tick Inverted. Mask Feather softens the edge, Mask Opacity controls strength and Mask Expansion grows or shrinks the shape.
Mask Controls
- Mask Path: stores the shape and holds the tracking and keyframes.
- Mask Feather: blurs the edge so the effect blends into the surroundings.
- Mask Opacity: controls how strongly the effect applies inside the mask.
- Mask Expansion: grows or shrinks the mask without redrawing it.
- Inverted: applies the effect outside the shape instead.
Tracking Methods
| Method | What It Follows | Best For |
|---|---|---|
| Position | Movement only | Subjects that stay the same size |
| Position and Scale | Movement and size changes | Subjects moving toward or away |
| Position, Scale and Rotation | Movement, size and angle | Subjects that spin or tilt |
| Manual keyframes | Whatever you set | Tracking that fails |
| Adjustment layer with mask | Same as above, on many clips | Grading a whole shot |
Masking And Tracking A Subject
- Add an effect such as Lumetri Color or Gaussian Blur to the clip.
- Draw a mask around the subject in the Effect Controls panel and set a feather of 20 to 60.
- Go to the first frame where the subject appears and click Track Selected Mask Forward.
- Wait for the tracker to finish, then scrub the clip to check the mask position.
- Fix drift by adjusting the mask at problem frames and tracking again from there.
Common Mistakes
- Starting the track in the middle of the clip, which leaves frames untracked.
- Using no feather, which makes the mask edge look harsh.
- Tracking over fast motion without correcting drift afterward.
- Putting effects on the clip and the mask on the wrong layer.
A Worked Example
You want to brighten a speaker while the background stays dark. Add Lumetri Color to the clip, raise exposure and draw an ellipse around the face. Feather by 50 and track forward. When the speaker turns, the mask drifts, so you fix it at that frame and track again. The speaker stays well lit through the whole shot.
Choosing The Right Shape
Use the ellipse for faces and round objects, the rectangle for screens and signs, and the pen tool for irregular shapes. Draw the shape slightly larger than the subject and rely on feather to blend it. Simple shapes track more reliably than complex outlines with many points.
Feather And Expansion
Feather should be sized to the scene. A small value suits a sharp edge, such as a building, while a large value suits skin and sky. Expansion lets you grow or shrink the mask without redrawing, which is useful when a track drifts slightly or the subject becomes larger.
Tracking Tips
Track forward from the start of the clip and watch the mask during playback. Good tracking depends on contrast and texture, so a subject on a plain background may drift. If the track fails, add keyframes at the problem frames or track in shorter sections.
Using Adjustment Layers
Placing the effect on an adjustment layer lets you mask and track across several clips with one setup. This is useful for grading a person who appears in multiple shots, and keeps the project organized. See adjustment layers in Premiere for more.
Blurring Faces And Plates
A common use is blurring something that must not be seen. Use a mosaic or Gaussian blur effect with a mask and track it. Check the result frame by frame, because any slip shows the hidden detail. Slightly larger masks and strong blur give a safer result.
Checking The Result
After tracking, play the clip at full speed and also step through frame by frame. Problems that are invisible at playback speed show up when stepping, especially at the start and end of movement. Toggle the effect on and off to confirm that the mask edge does not pulse or shift, and fix any flicker by adjusting feather or expansion.
Saving Time On Repeated Setups
If you use the same masked effect often, such as a face glow, save it as a preset. Copy the effect with its mask to similar clips, then retrack each one. This keeps the look consistent across a project and cuts setup time, while still letting each shot get its own correct tracking data.
Masking Without Tracking
Not every mask needs tracking. A static camera and a static subject need only a fixed mask, and a slow camera move may need two or three keyframes. Use tracking when motion is complex, and keyframes when it is simple, because fewer moving parts make the result more reliable.
Handy for this: Fast Wide-Angle Lens — gather more starlight. (affiliate link)
Advanced Deeper Mechanics And Combinations
How The Tracker Works
The tracker follows patterns of pixels from frame to frame and moves the mask accordingly. It works best on subjects with clear edges and consistent lighting, and struggles with motion blur, occlusion and similar surfaces. Understanding this helps you pick good start frames and know when to intervene manually.
Mask Keyframes And Corrections
Tracking can be combined with manual keyframes, as covered in Premiere keyframes. Use them to adjust the mask shape when the subject changes pose, or to change feather and opacity over time. A mix of automatic tracking and small manual fixes is often the fastest path to a clean result.
Moving To After Effects For Hard Cases
When Premiere tracking is not enough, tools in After Effects offer more control, as shown in After Effects motion tracking and masks and blend modes. For difficult separations from the background, the roto brush can create the mask for you. Use Dynamic Link to keep the clip in sync with the edit.
Speed And Performance
Masks and tracking add processing load. If playback stutters, lower the preview resolution, render the section or use proxies. Keep the number of masked effects reasonable and apply them to the parts of the timeline that need them. See also Lumetri color basics for grading with masks.
Try It
- Add Lumetri Color to a clip with a moving subject.
- Draw an ellipse mask around the subject and set feather to about 50.
- Track forward and scrub through the clip to check the result.
- Correct any drift and compare the shot with the mask on and off.
Common Questions
What is masking in Premiere Pro?
It limits an effect to a shape you draw, so only that part of the frame is changed.
How do I track a mask?
Use the track buttons under the mask in Effect Controls, starting from the first frame where the subject appears.
Why does my mask drift?
The tracker may lose contrast or the subject changes shape. Correct the mask at that frame and track again.
Can I mask on an adjustment layer?
Yes. Applying the effect and mask to an adjustment layer affects everything below it.
Related Lessons
- Premiere Keyframes for animating masks.
- Adjustment Layers In Premiere for masks across clips.
- After Effects Motion Tracking for harder tracks.
- After Effects Roto Brush for subject cutouts.
- Lumetri Color Basics for grading with masks.
Gear That Helps With This
Hand-picked kit that makes this lesson easier to put into practice.
Some links are affiliate links: if you buy through them we may earn a small commission at no extra cost to you. How this works.