
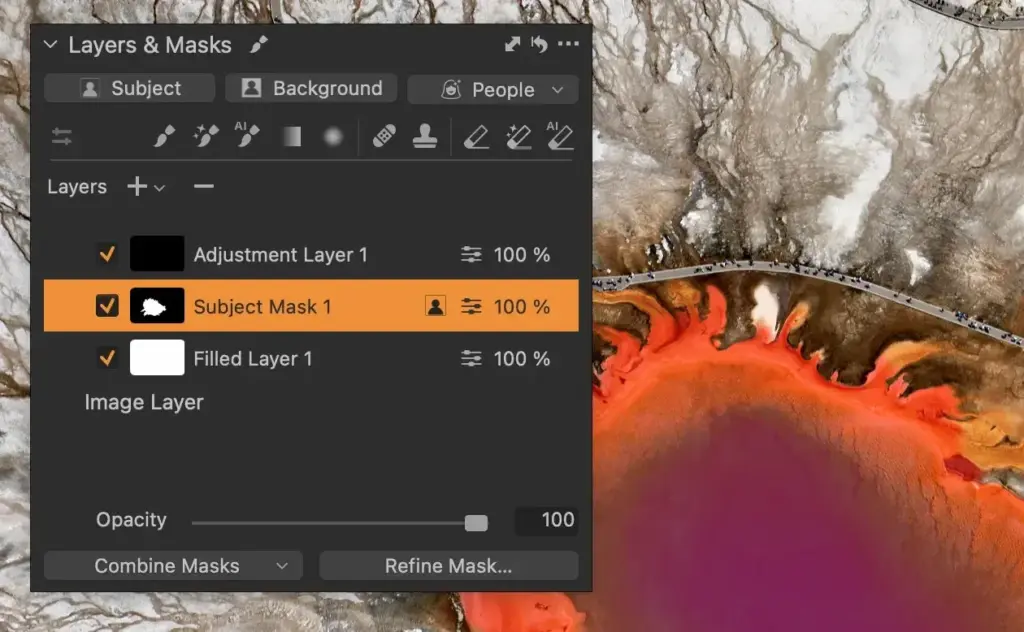
Capture One layers are separate editing layers that apply adjustments to selected parts of a photo through masks. You can paint a mask with a brush, draw a linear or radial gradient, or create a luma range mask, then change exposure, color and detail on that layer only. Each layer can be named, adjusted, copied and removed.
Why It Matters
Global adjustments change every pixel, which is rarely what a photo needs. Layers let you lift a face, darken a sky or sharpen the eyes without affecting the rest of the picture.
Capture One is known for its color tools, and layers let you apply them locally for fine skin tone and product color work.
Beginner Capture One Layers For Beginners
A layer in Capture One is a container for adjustments and a mask. You add a layer, paint or draw the area where the changes apply, and then use tools such as exposure, color balance or clarity on that layer. The base image is not affected.
Creating A Layer
- Open the Layers tool and click the plus button to add a new empty layer, or a filled layer.
- Choose the brush for painting, or the gradient mask tool for skies and foregrounds.
- Paint over the area you want to edit, and check the red overlay for the mask.
- Adjust exposure, contrast and color for that layer.
- Rename the layer so you can find it later.
Layer Types
| Type | Use |
|---|---|
| Empty layer | Paint a mask by hand for precise areas |
| Filled layer | Apply an effect to the whole picture and erase parts of it |
| Linear gradient mask | Skies, foregrounds and horizons |
| Radial gradient mask | Vignettes and spotlights |
| Luma range mask | Select bright or dark areas by brightness |
| Color range mask | Select areas by hue, for skin tones or foliage |
Brush Settings
- Size controls the diameter of the brush.
- Hardness controls how soft the edge is.
- Opacity controls the strength of the mask.
- Flow controls how quickly the paint builds up.
- Auto Mask helps the brush stay inside edges.
Common Mistakes
- Painting with a hard brush and leaving visible edges.
- Making all the changes on one layer, which makes it hard to adjust one area later.
- Forgetting to check the mask with the overlay.
- Using very strong adjustments, so the layer looks unnatural.
First Layer Checklist
Add one layer, give it a name, paint a small area, change one slider, and toggle the layer on and off. Once you can do that smoothly, everything else is the same steps repeated.
Handy for this: Pen Tablet — precise retouching. (affiliate link)
Advanced Refining Masks, Color Edits And Workflow
Refining A Mask
After painting, refine the mask with the refine edge tool, which smooths and feathers the edges. The feather slider softens the transition, and the radius controls how far it spreads. Use the eraser brush to remove mask from areas that spilled over. Luma and color range masks can be combined with a painted mask, so the adjustment only applies to bright or colored areas inside it. This is a quick way to avoid halos.
Local Color Editing
Capture One has detailed color tools, and they work on layers. The Color Editor can be restricted to one layer, so you can change skin tones on a face without touching the clothing. The Skin Tone tab smooths and evens tones, and the Color Balance tool can warm a subject or cool a background. Compare these ideas with the Capture One color editor and Lightroom masking.
Copying And Applying Layers
- Copy layers between photos from the same shoot and adjust the mask.
- Use the apply layers command to paste a gradient to many images.
- Save layer adjustments as styles or presets for repeat work.
- Duplicate a layer to try a different strength, then delete the one you do not need.
- Use the layer opacity slider to reduce the overall effect.
Skin And Portrait Work
For portraits, create a layer for the face, paint with a soft brush at lower opacity, and lift exposure slightly. Use another layer to reduce shine, by lowering highlights in the skin. Add a layer for the eyes with a small amount of contrast and clarity. Keep each effect small, and examine the picture at 100 percent. For retouching beyond Capture One, see frequency separation.
Landscape And Product Work
Use a linear gradient to darken the sky and a second gradient to lift the foreground, and then a luma mask to protect bright clouds. For products, use a color range layer to match the color of the item to the real thing, and use a layer with clarity to bring out texture. Keep names that describe the purpose, such as Sky, Face and Label.
Working Efficiently
- Learn keyboard shortcuts for brush size and mask display.
- Use a tablet or a mouse with a smooth scroll wheel for brush control.
- Create a standard set of layers for each type of shoot.
- Check the picture at different zoom levels.
- Compare with the original often to avoid overediting.
When your layers are done, export the picture with the settings you need, and the masks stay in the catalog or session for later changes. Because the adjustments are not destructive, you can reopen a layer a year later and change it. Compare other workflows in Lightroom select subject if you use both programs.
Layer Order And Opacity
Layers are applied in order, so a layer placed later can override an earlier one in places where masks overlap. Use opacity and mask feathering to control how strongly each layer contributes, and keep similar edits on the same layer where possible. Fewer well-named layers are easier to maintain than a long list of small ones.
Try It
- Open a portrait or landscape photo in Capture One and add a new empty layer.
- Paint over one area with a soft brush and change the exposure only for that layer.
- Add a gradient mask layer for the sky or background, and adjust the color.
- Rename each layer and compare the picture with and without the layers.
Common Questions
Are Capture One layers destructive?
No. Layers store adjustments and masks, and the original file stays untouched. You can change or delete a layer at any time.
How many layers can I use?
You can add many layers to one picture, though keeping them organized and named is more important than using more of them.
Can I copy layers to other photos?
Yes. Copy and apply them to many photos, and then adjust the mask for each one if the subject is in a different place.
How do layers compare with Lightroom masks?
They work in a similar way, with brushes, gradients and range masks. Capture One layers combine well with its color tools, and some people find the brush controls more precise.
Related Lessons
- Lightroom Masking for a similar tool in Lightroom.
- Capture One Color Editor for color changes on layers.
- Frequency Separation for advanced skin retouching.
- Gradient Filters In Lightroom for gradient masks.
- Lightroom Presets to save and reuse adjustments.
Gear That Helps With This
Hand-picked kit that makes this lesson easier to put into practice.
Some links are affiliate links: if you buy through them we may earn a small commission at no extra cost to you. How this works.