
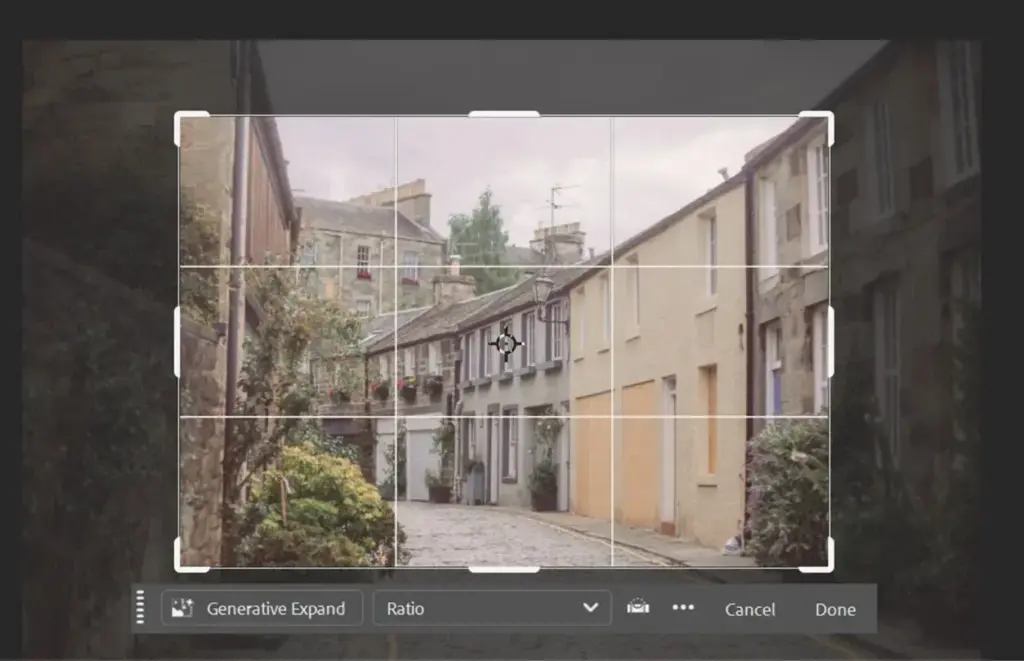
The Photoshop crop tool trims or extends an image to a new frame, while Canvas Size changes the working area and Image Size changes the pixel dimensions. Use Delete Cropped Pixels off for non-destructive crops, keep the original ratio when you need it, and resample only when you must.
Why It Matters
Cropping, canvas and image size sound similar but behave very differently. Mixing them up leads to blurry enlargements, lost edges and files that print or post at the wrong dimensions.
Learning which control to reach for takes only a few minutes and prevents most of the common mistakes. It also keeps your edits flexible, so you can change the framing again next week without starting over.
Beginner Using The Photoshop Crop Tool, Canvas Size And Image Size
What Each Control Does
| Control | What It Changes | Typical Use |
| Crop tool | Visible frame, optionally pixel count | Better composition, straighten a horizon, change aspect ratio |
| Canvas Size | Working area around the image | Add a border or extra space for a sky |
| Image Size | Total pixel dimensions and resolution | Prepare for web, email or print |
Cropping Step By Step
1. Press C to choose the Crop tool.
2. Pick a ratio such as 4:5, 1:1 or 16:9 from the options bar, or choose Original Ratio.
3. Drag the corner handles to set the frame. Drag inside to reposition the image.
4. Leave Delete Cropped Pixels unchecked so the trimmed area is hidden, not erased.
5. Press Enter to commit the crop.
If you later want more of the picture back, choose the Crop tool again and drag the handles outward. The hidden pixels return.
Straightening A Horizon
With the crop tool active, click Straighten and drag a line along the horizon. Photoshop rotates the frame to match. You can also drag just outside a corner to rotate by hand, and turn on Content-Aware to fill any blank corners.
Canvas Size
Choose Image, then Canvas Size. Enter a new width and height, tick Relative to add a specific amount, and use the anchor grid to decide which side grows. The new area fills with the background color you choose. Add a white border for a print mat or extend the top of a photo for text.
Image Size
Choose Image, then Image Size. Check the Resample box only when you want to change the pixel count. For web use, set a long edge such as 2048 pixels. For a print at 300 pixels per inch, an 8 by 10 inch print needs 2400 by 3000 pixels.
Common Mistakes
– Using Image Size to enlarge a small file and expecting new detail.
– Cropping with Delete Cropped Pixels on, then needing the edge back.
– Changing resolution with Resample on and losing sharpness without noticing.
– Choosing a ratio by eye and ending up with an awkward print size.
Handy for this: Pen Tablet — precise retouching. (affiliate link)
Advanced Non-Destructive Habits And Resampling For The Crop Tool
Crop On A Smart Object
When you plan heavy filters or resizing, convert the layer to a Smart Object first. You can then scale and re-crop later with no permanent loss, and filters remain editable. See smart objects for how the container works.
Content-Aware Crop And Extending Canvas
Dragging the crop handle outside the image creates blank space. With Content-Aware turned on, Photoshop fills it from surrounding pixels, which works well for skies and textures. For more control, use content-aware fill or generative fill on the empty area afterward and keep it on a separate layer.
Choosing A Resampling Method
Photoshop offers several methods in Image Size. Automatic picks a sensible option. Preserve Details 2.0 is useful for enlarging, with a noise reduction slider to hide artifacts. Bicubic Sharper suits reducing size, since it keeps edges crisp. Bicubic Smoother softens upscaling. Always reduce a file from the original and not from an already shrunken copy, because repeated downsampling softens detail.
Resolution Versus Pixels
Resolution in pixels per inch is only a label until you print. A 6000 by 4000 pixel file is the same amount of data whether it is labeled 72 or 300. Changing the label with Resample off changes the print size and nothing else. For print, work from the final size and required pixels per inch, and see resize and resolution for the wider workflow.
Aspect Ratio Planning
Crops should match the destination. Instagram portraits use 4:5, standard prints often use 4:6 or 8:10, and video thumbnails use 16:9. Cropping an image for 8 by 10 from a 2:3 camera frame removes roughly 17 percent of the long side, so leave room when shooting. For composition thinking, read cropping photos.
Shortcuts Worth Learning
– C for crop, X to swap orientation, and Enter to commit.
– Hold Alt or Option to crop from the center.
– Hold Shift to constrain proportions when a ratio is not set.
– Press O to toggle the overlay, and cycle through grids such as Thirds or Golden Ratio.
Cropping For Print Sizes
Common print sizes do not share one ratio, so one crop rarely fits all. A 3:2 camera frame matches 4 by 6 inch prints exactly, but 5 by 7 inch prints need about 7:5, 8 by 10 inch prints need 5:4, and 11 by 14 inch prints need roughly 11:14. Before ordering, set the crop tool to the print ratio and see what falls off the edge. If a subject touches the frame, leave extra room because framing and trimming at a lab can shave a few millimeters from each side.
Cropping Versus Moving Closer
A crop discards pixels, so the final file has fewer of them. A 24 megapixel frame cropped to half its width keeps about 6 megapixels, which is enough for a good 8 by 10 inch print at 300 pixels per inch but not for a poster. Cropping also changes the apparent perspective less than people expect, since perspective depends on where you stood, not on what you trimmed. If you routinely crop to the same ratio, learn to compose for it in the viewfinder and save the pixels.
Working With Presets And Overlays
The crop tool can store presets such as 1080 by 1350 pixels for portrait posts. Choose New Crop Preset from the ratio menu and name it. Overlay options include Rule of Thirds, Grid, Diagonal, Triangle, Golden Ratio and Golden Spiral, and the O key cycles through them, with Shift+O changing their orientation. Use the overlay that matches how you think about the picture, and then judge the crop by eye with the guides hidden.
Checking Your Result
After any size change, zoom to 100 percent and look at edges, eyelashes, fine text and foliage. These areas show softening and halos first. If sharpness has dropped after reducing size, apply a gentle output sharpening step to the smaller copy only, never to the master file. Keep a layered original and a flat exported copy so you can always return to full resolution.
Try It
- Open a photo and convert it to a Smart Object.
- Crop to 4:5 with Delete Cropped Pixels off, then re-open the crop and widen it again.
- Add 200 pixels of canvas to the top, anchored at the bottom, and fill it with content-aware fill on a new layer.
- Use Image Size to create a 2048 pixel long edge copy for web, and save it under a new name.
Common Questions
What is the difference between Canvas Size and Image Size?
Canvas Size changes the working area around the picture without scaling it. Image Size scales the picture and changes its pixel dimensions. One adds space, the other resizes content.
Why does my cropped image look blurry?
You probably resampled it up with Image Size or cropped so tightly that few pixels remain. Start from the original, use a higher quality resampling method, and avoid large enlargements.
Can I undo a crop later?
Yes, if Delete Cropped Pixels was off. Select the Crop tool again and drag the handles outward to bring the hidden pixels back.
What size should I export for the web?
A long edge of 1600 to 2400 pixels is common for sharp display on modern screens. Save with moderate quality to keep file sizes small.
Related Lessons
- Smart Objects to keep crops and resizes editable.
- Resize And Resolution for print and web sizing in more detail.
- Content-Aware Fill for filling new canvas.
- Cropping Photos for the composition side of cropping.
- Aspect Ratios to pick a frame that fits the destination.
Gear That Helps With This
Hand-picked kit that makes this lesson easier to put into practice.
Some links are affiliate links: if you buy through them we may earn a small commission at no extra cost to you. How this works.