
LUTs explained in one line: a LUT, or lookup table, is a file that maps each input color and brightness value to a new output value. Editors and cameras use LUTs to convert log footage to a normal look, to preview a style on set, or to apply a creative color look quickly.
Why It Matters
LUTs are everywhere in video: cameras display them on monitors, editing software loads them with a click, and online stores sell thousands of looks. Using them well saves time. Using them blindly makes footage clip, band or look muddy.
Understanding what a LUT actually does lets you pick the right one, place it correctly in your workflow and fix problems when a look does not behave the way the preview suggests.
Beginner LUTs Explained For New Editors
Think of a LUT as a table that says: when you see this color, show that color instead. A simple 1D LUT changes brightness per channel, like a curve. A 3D LUT changes combinations of red, green and blue together, so it can alter hue and saturation as well as brightness. Most video LUTs are 3D LUTs in .cube format, with sizes such as 17, 33 or 65 points per side, and larger sizes give smoother results.
Main Kinds Of LUTs
- Technical or conversion LUTs transform footage from one color space or log curve to another, such as log to Rec.709.
- Creative LUTs add a stylistic look, such as warm shadows or a film-like contrast.
- Camera monitoring LUTs show a preview on set without changing the recorded file.
- Display LUTs correct a screen or monitor during editing.
- Input LUTs apply at the start of the pipeline and output LUTs at the end.
Conversion LUT Versus Creative LUT
| Type | Purpose | Where To Apply |
|---|---|---|
| Conversion LUT | Make log or raw footage look correct | First, before grading |
| Creative LUT | Add a mood or style | After correction, at reduced strength |
| Monitoring LUT | Preview on a camera or field monitor | On the monitor only |
| Film emulation LUT | Mimic the look of a film stock | After correction, often with grain |
| Display LUT | Calibrate a screen | At the display or system level |
Apply A LUT Safely
- Correct exposure and white balance first, so the LUT receives a sensible input.
- Apply a conversion LUT that matches the camera and recording format, such as the camera maker log to Rec.709 LUT.
- Check the scopes to see whether highlights or shadows clip after the LUT.
- Add a creative LUT only if you want a stylized look, and reduce its strength to taste.
- Make small corrections after the LUT to match shots, instead of changing the LUT itself.
Common Mistakes
- Using a LUT made for one camera or log curve on footage from another, which gives wrong colors.
- Applying a creative LUT before correcting exposure, so the look breaks on dark or bright clips.
- Leaving a LUT at 100 percent strength when it clips highlights or crushes shadows.
- Judging a LUT from a thumbnail instead of testing it on real footage with the scopes open.
A Worked Example
A clip recorded in a flat log profile looks pale and gray. Applying the camera maker conversion LUT brings contrast and saturation to a normal range. Skin tone is now close to correct but slightly bright, so you lower exposure before the LUT and fine-tune after it. A final creative LUT at 40 percent strength adds a gentle warm look without hurting skin.
Where The LUT Sits In The Chain
Order matters because a LUT expects a particular input. A conversion LUT assumes untouched log footage, so exposure changes made after it behave differently from changes made before it. Put corrections ahead of the LUT when you want to feed it the correct input, and put adjustments after when you only want to fine-tune the look. Keep the structure the same on every clip.
Storage And Naming
Name LUT files with the camera, input space and output space, such as camera-log-to-rec709. Keep them in one folder and note which ones come from the camera maker. Untitled LUTs with vague names such as cinematic-1 are easy to misuse. A tidy library saves guesswork and helps teammates apply the correct file.
Handy for this: Fast Wide-Angle Lens — gather more starlight. (affiliate link)
Advanced Technical Detail And Common Pitfalls
Clipping And Banding
A LUT can push values beyond the legal range or squeeze them into a smaller range. Clipped highlights cannot be recovered afterward. Banding appears in smooth gradients when 8-bit footage is stretched by a strong LUT, since there are fewer steps to spread. Use footage with higher bit depth when you can, as discussed in 8-bit versus 10-bit video, and keep the LUT strength moderate.
Exposure Before The LUT
Most conversion LUTs expect log footage exposed correctly. If a clip is underexposed, noise in the shadows will be amplified after conversion. The method for exposing log footage is covered in exposing log, and the nature of the format in log footage. Bring correct exposure into the shot rather than expecting the LUT to rescue it.
Color Management As An Alternative
Instead of loading a LUT on every clip, many colorists use a color managed project that converts footage into a working space and out to the display. Resolve and other tools have this built in, as discussed in Resolve color management. It handles conversions precisely and makes it easy to switch to a different output such as HDR. LUTs still help for quick looks and for on-set previews.
Technical Versus Creative Roles
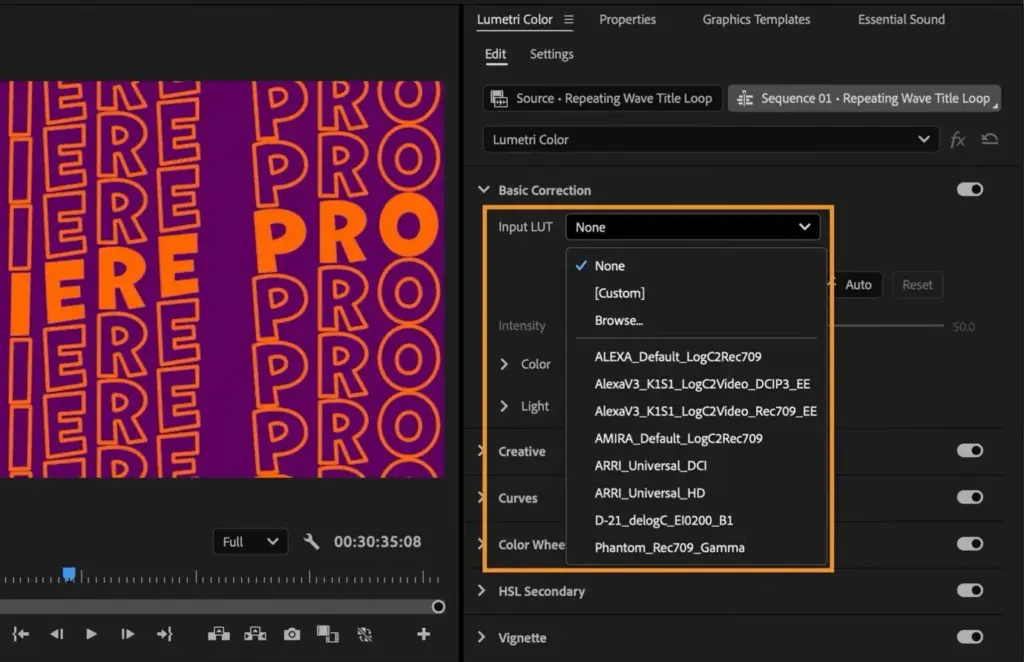
The most common mistake is treating a technical LUT as a creative look and vice versa. The distinction and a workable pipeline are explained in technical vs creative LUTs. In the editor, apply them through the Input LUT slot or an adjustment layer, as shown in Lumetri color basics. Keep creative looks removable so you can adjust or replace them later.
Try It
- Find a log clip and view it without any LUT, then apply the camera maker conversion LUT.
- Open the waveform and check that highlights and shadows sit in a healthy range.
- Add a creative LUT and reduce its strength until skin tones look natural.
- Toggle both LUTs off and on to see exactly what each one changes.
Common Questions
What does LUT stand for?
LUT stands for lookup table. It is a table that tells software what output color to produce for every possible input color.
Can I use any LUT on any footage?
No. A LUT is made for a specific input, such as one camera log curve. Using it on a different format gives inaccurate colors.
Do LUTs damage footage?
They do not change the original file, but a strong LUT can clip or band the image in your edit. Use a moderate strength and check the scopes.
Is a LUT the same as a preset?
No. A preset changes slider values in an editor. A LUT is a fixed color mapping stored in a file that works across many programs.
Related Lessons
- Technical Vs Creative LUTs to build a clean pipeline around LUTs.
- Log Footage to understand why conversion is needed.
- Exposing Log to feed a LUT properly exposed footage.
- Lumetri Color Basics for applying LUTs and corrections in Premiere.
- Resolve Color Management for a LUT-free, managed alternative.
Gear That Helps With This
Hand-picked kit that makes this lesson easier to put into practice.
Some links are affiliate links: if you buy through them we may earn a small commission at no extra cost to you. How this works.