
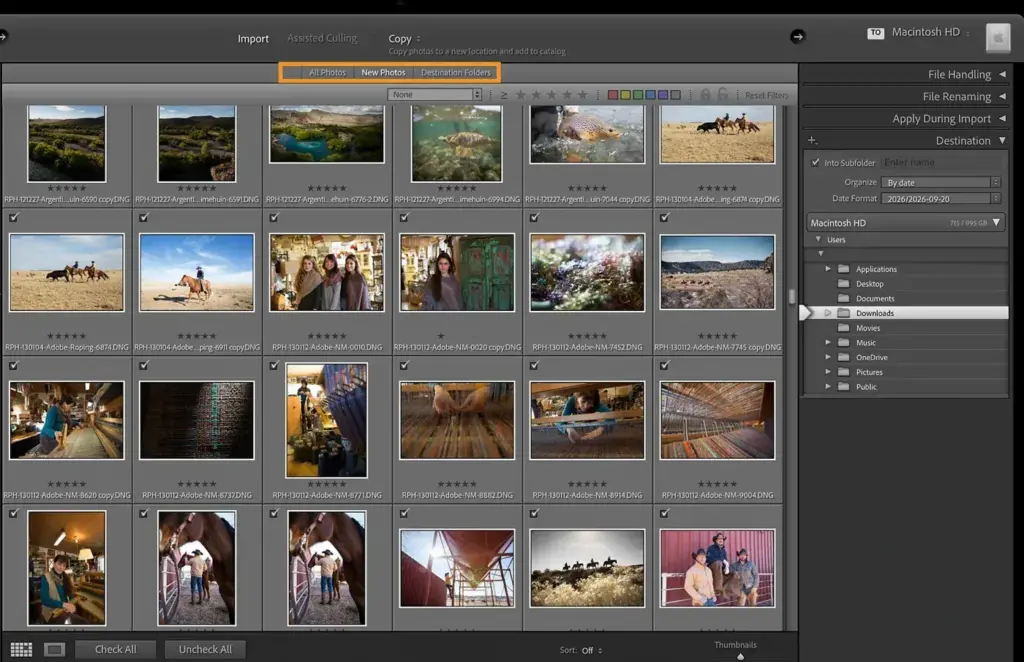
The Lightroom import dialog decides how photos enter your catalog: whether files are copied or only added, where they go, how they are renamed, and what metadata, develop preset and previews are applied. Getting these choices right once means every later shoot arrives sorted, labeled and ready to cull.
Why It Matters
Import is the only moment when Lightroom can rename files, add your copyright, apply a starting look and build previews in one pass. Skipping it or rushing it leaves you fixing the same things by hand across thousands of photos.
A good import setup also protects your originals. A copy made during import can serve as a second backup, and a clear folder structure from the start means you rarely have to hunt for a file later.
Beginner The Essential Lightroom Import Choices
In Lightroom Classic, open the Library module and click the Import button at the lower left, or choose File, then Import Photos and Video. The dialog has a source panel on the left, a thumbnail grid in the center and settings panels on the right.
Copy, Move Or Add
At the top center, you choose how the files are handled. Copy as DNG converts to Adobe’s raw format while copying. Copy copies the files to a new location and adds them to the catalog. Move copies them and deletes the originals from the source. Add leaves the files where they are and only registers them. Use Copy when importing from a memory card, because the card stays untouched until you format it yourself. Use Add when the photos are already in the folder where you want them to stay.
File Handling Panel
- Build Previews: Minimal is fast, Standard is the usual choice, and 1:1 builds full-size previews so zooming is quick but import takes longer.
- Build Smart Previews: Turn this on if the originals will sit on an external drive and you want to edit when it is unplugged.
- Don’t Import Suspected Duplicates: Keep this checked so the same photo is not imported twice.
- Make a Second Copy To: Choose a folder on a different drive to get a backup of the cards as they import.
File Renaming Panel
Camera names such as DSC_1234 repeat after a counter rolls over. Rename files with a template that includes the date, such as the shoot date followed by a sequence number. Unique names help when you search, export and avoid overwriting files with the same name.
Apply During Import
- Choose a Develop Settings preset if you want a baseline look. A gentle preset is better than a heavy one.
- Add a Metadata preset containing your name, copyright and contact details so every file carries them.
- Add keywords that apply to the whole batch, such as the location or event.
Destination Panel
Pick the parent folder, then choose Into Subfolder with an organization option such as By Date. A date format with year and then date keeps shoots in order. Avoid deeply nested folders, since they make navigation harder. A matching plan is described in Lightroom catalog setup.
Save An Import Preset
At the bottom of the dialog, the Import Preset menu lets you save the whole group of settings under a name. Make one preset for card imports and another for photos already on your drive. Next time you import, select the preset and the dialog fills itself in.
Common Mistakes
- Importing with Add from a memory card, which leaves the catalog pointing at files that vanish when the card is erased.
- Applying a strong creative preset to every photo, which hides exposure problems during culling.
- Forgetting to uncheck photos already imported, causing needless duplicates.
- Leaving previews at Minimal and then waiting on slow thumbnails while culling.
Handy for this: Pen Tablet — precise retouching. (affiliate link)
Advanced Performance, Metadata And Automation
Choosing The Preview Size
Standard previews are sized to your screen and suit most work. One-to-one previews are the full pixel size and make zooming to check focus nearly instant, but they use more disk space and add import time. If you cull many frames each day, building 1:1 previews while you take a break pays back the time. Lightroom can discard them later on a schedule. For slow browsing caused by large caches, see Lightroom performance.
Metadata That Helps Later
Copyright and contact fields in a metadata preset are the most useful data to apply at import. Camera and lens details are already read from the file, so you do not need to enter them. Add location or event keywords at import only if the whole batch shares them. More detailed keywording is faster once photos are culled, since you will not waste effort on rejected frames. Keyword structure is covered in collections and keywords.
Auto-Import And Watched Folders
Lightroom Classic can watch a folder and import any new files that appear in it. This is mainly used with tethered capture or with software that exports to a set folder. You set the watched folder and a destination in File, Auto Import. Keep the watched folder empty apart from incoming files, because everything placed there will be imported.
Handling Raw Plus JPEG Pairs
If the camera records both raw and JPEG files, Lightroom can treat the JPEG as a sidecar of the raw. A preference in the general settings, called Treat JPEG files next to raw files as separate photos, controls this. Leave it off for a cleaner library. If you want to keep the JPEG, turn the option on, but expect each frame to appear twice.
Converting To DNG
Copy as DNG converts proprietary raw files into an open raw format. It can save space with lossless compression and embeds metadata in the file. It also changes your originals, so some photographers prefer to keep the camera raw files unchanged. Pick one policy and keep to it, since mixing makes archives inconsistent.
Reviewing Before You Import
Switch the grid to larger thumbnails and uncheck obvious failures, such as frames with a covered lens, before importing. This keeps the catalog lean, though many people import everything and cull afterwards, which is covered in culling photos. Either approach works, as long as you apply the same habit every time.
Dealing With Card Readers
A dedicated card reader is usually faster and safer than plugging the camera into the computer. Eject the card properly before removing it. Format the card in the camera only after you confirm the files exist in the destination and in your second copy.
Try It
- Open the Import dialog with a folder of 30 sample photos and set the top option to Copy.
- Choose Standard previews, turn on Don’t Import Suspected Duplicates and select a destination folder organized By Date.
- Create a metadata preset with your name and copyright, and apply it during import.
- Save your choices as an import preset, then run the import and check that the folder and file names appear as planned.
- Cull the imported photos and note whether the previews were fast enough.
Common Questions
Should I choose Copy or Add when importing?
Choose Copy when importing from a memory card, so the files land on your drive. Choose Add only when the photos are already in the folder where they should permanently stay.
Do import presets change my photos?
Develop presets applied at import add edit settings to the catalog, but the original files remain unchanged. You can remove or change those settings later.
What preview size should I build?
Standard is enough for most work. Choose 1:1 if you zoom to check focus on many frames, and accept the longer import time and extra disk space.
Can I rename files after importing?
Yes. Select the photos and use Rename Photos from the Library menu. Renaming during import is easier because it happens once, in a single pass.
Related Lessons
- Lightroom Catalog Setup to choose where the catalog and folders live.
- Culling Photos Fast to sort keepers from rejects after import.
- Lightroom Smart Previews to edit when the original drive is away.
- Lightroom Presets to choose a starting look worth applying at import.
- Collections, Keywords, And Finding Photos to organize photos after they are imported.
Gear That Helps With This
Hand-picked kit that makes this lesson easier to put into practice.
Some links are affiliate links: if you buy through them we may earn a small commission at no extra cost to you. How this works.