
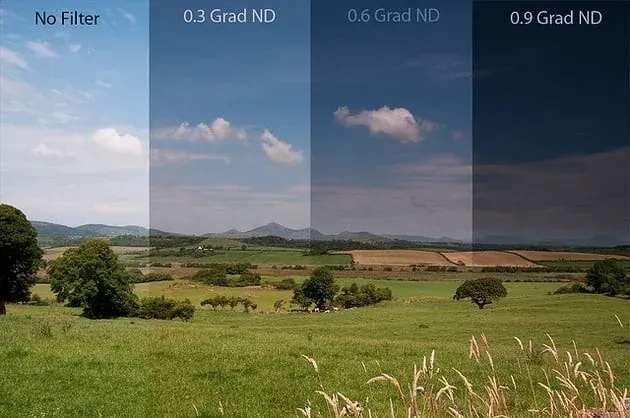
Graduated ND filters are rectangular or round pieces of glass or resin that are dark at the top and clear at the bottom, so they darken a bright sky while leaving the foreground untouched. They help a single exposure hold detail in both areas when the scene has more contrast than the sensor can capture.
Why It Matters
A sunrise or sunset landscape often has a sky several stops brighter than the land. If you expose for the land, the sky turns white, and if you expose for the sky, the foreground becomes a dark silhouette. Cameras have improved, but a very bright sky next to a shaded foreground can still exceed the range of a sensor.
A graduated filter balances the scene in front of the lens, so the image looks natural and needs less correction later. It also preserves cloud shape and color in the sky, which can be difficult to recreate in editing.
Beginner Using Graduated ND Filters In Landscapes
The filter is placed in a holder in front of the lens, and the transition line is positioned over the horizon. The darker part covers the sky.
Choosing Strength And Edge
| Type | Edge | Best for |
|---|---|---|
| Soft edge | Gradual transition | Uneven horizons, hills and trees |
| Hard edge | Sharp transition | Flat horizons, such as the sea |
| Reverse | Darkest at the middle | Sunrises and sunsets near the horizon |
| Medium | Gradual with a fast middle | General use |
Strength is measured in stops. A one-stop filter is called ND 0.3, two stops is ND 0.6, and three stops is ND 0.9. Two stops is the most useful starting point for many scenes.
Using Graduated ND Filters Step By Step
- Mount the camera on a tripod and compose the scene.
- Meter the sky and the foreground separately, using spot metering, and note the difference in stops.
- Choose a filter that matches the difference, such as two stops for a two stop gap.
- Slide the filter into the holder and position the transition on the horizon, using live view to see the effect.
- Expose for the foreground, take the picture, and check the histogram.
Handling The Horizon
- Use a soft edge filter when mountains or trees rise above the horizon, to avoid dark halos.
- Adjust the filter height slowly while watching the screen.
- Use a hard edge only when the horizon is flat and clean.
- Check the corners for vignetting, especially with wide lenses.
Common Mistakes
- Using too strong a filter, which makes the sky look dark and artificial.
- Placing the transition too high or low, so a band appears across the scene.
- Forgetting that the filter darkens everything it covers, including mountains and buildings that rise into the sky.
- Dirty or scratched filters, which cause flare and soft areas.
A Quick Exercise
Photograph a scene near sunset with no filter, then with a two stop soft filter. Compare the sky detail and foreground in each photo, and look at the histograms.
Handy for this: ND And Polarizing Filters — control light and glare. (affiliate link)
Advanced Filter Systems, Alternatives And Processing
Filter Systems And Materials
Square filters use a holder and adapter ring on the lens, and the filter slides up and down. Sizes of 100 mm wide are common for full frame lenses, and 150 mm for very wide lenses. Glass filters resist scratches, while resin filters are lighter and cheaper but scratch more easily. Screw-in round graduated filters are less flexible because the transition cannot move. Read the camera filters guide and ND filters for video for neutral density basics.
Color Casts And Quality
Cheap filters may add a color cast, often magenta or blue, which you can correct with white balance. Higher quality filters are neutral but cost more. Stacking several filters increases the chance of flare and reduces sharpness, so use as few as possible. Keep the front of the filter clean and shield it from direct light with a lens hood or a hand. See lens flare and cleaning camera lenses.
Alternatives: Bracketing And Digital Gradients
Modern cameras and editing software offer alternatives. Exposure bracketing captures several frames at different exposures and blends them, giving more control with no glass in front of the lens. Digital graduated filters in Lightroom and Photoshop darken the sky after the fact, but they cannot recover detail that clipped in the original. For many photographers, bracketing is more flexible, while a physical filter saves time and works with moving elements such as waves. Learn the methods in exposure bracketing, HDR photography and Lightroom gradient filters.
Combining With Other Filters
Graduated filters are often paired with polarizers, which deepen blue skies and reduce glare, and with solid ND filters to enable long exposures of water or clouds. A polarizer can create uneven darkness in wide-angle skies, so use it with care. See long exposure photography, silky water technique and seascape photography.
Metering And Exposure Technique
Use spot metering on the brightest part of the sky and the darkest important part of the land to measure the scene’s range. Divide the difference between stops to choose filter strength, leaving the sky a stop or less brighter than the land for a natural look. Check the histogram and highlight alerts after each shot. See spot metering technique and reading histograms.
Workflow For Sunrise And Sunset
Arrive early to set up the tripod, and test filter positions before the best light. Light changes quickly, so adjust the filter strength as the sun rises. Take extra frames without the filter as a backup for blending. See golden hour photography and landscape planning.
Editing Filtered Images
Filtered images usually need less work, but check the transition area. Use a gradient mask to fine-tune the sky, add contrast to the clouds, and correct any color cast. Avoid applying a strong digital gradient on top of the physical one, or the sky will look heavy. See Lightroom masks.
Try It
- Choose a scene with a bright sky and measure the stop difference with spot metering.
- Take a shot with no filter, then with a soft edge two stop filter.
- Shift the filter height by a few millimeters and note how the transition changes.
- Bracket three frames without the filter and compare the result in editing.
Common Questions
What do graduated ND filters do?
They darken part of the frame, usually the sky, while leaving the rest clear. This reduces the contrast between a bright sky and a darker foreground so both can be captured in one exposure.
What strength graduated filter should I buy?
A two-stop soft edge filter is a versatile first choice. Add a three-stop hard edge later for strong sunsets over flat horizons.
Soft edge or hard edge?
Soft edge is easier to use because it blends gradually and tolerates uneven horizons. Hard edge works well for flat horizons like seascapes.
Can I replace graduated filters with software?
Software gradients help but cannot recover clipped highlights. Bracketing and blending offers more flexibility, while a physical filter protects the highlights during capture.
Related Lessons
- ND Filters For Video for solid neutral density basics.
- Exposure Bracketing as an alternative for high contrast scenes.
- Gradient Filters In Lightroom for finishing the sky.
- Camera Filters Guide to see which filters matter most.
- Dynamic Range Explained for why the sky and land cannot always fit.
Gear That Helps With This
Hand-picked kit that makes this lesson easier to put into practice.
Some links are affiliate links: if you buy through them we may earn a small commission at no extra cost to you. How this works.