
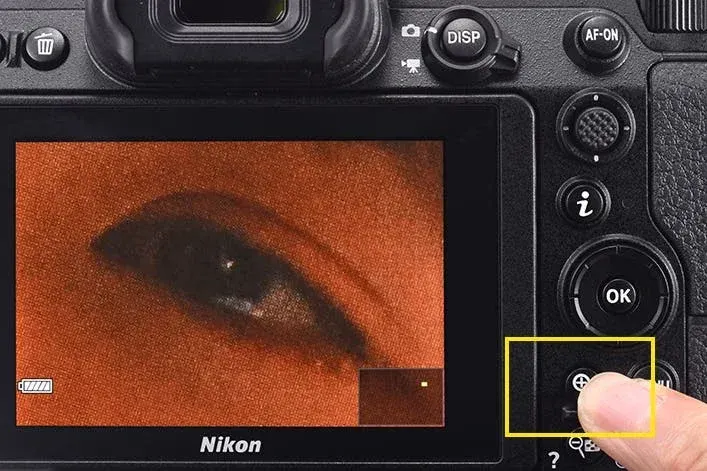
Live view zoom focus is a camera feature that magnifies part of the live image on the screen, usually 5 or 10 times, so you can see exactly where the lens is sharp. Turn the focus ring slowly until fine detail looks crisp, rock past the peak and back, then return to the sharpest point before shooting.
Why It Matters
Autofocus is quick, but it cannot always be trusted. In low light, on flat surfaces, through glass, with macro subjects or on a tripod for landscapes, the camera may choose the wrong spot or hunt without locking. Manual focus is the answer, but a small viewfinder image or the whole picture on a screen is not enough to judge fine sharpness.
Magnified live view solves this. By enlarging a small area of the sensor image, it shows blur that would be invisible at normal size. It costs a little time and a tripod, but it is one of the most reliable ways to get a sharp photo.
Beginner Live View Zoom Focus: Step By Step
What You Need
- A camera with live view or an electronic viewfinder.
- A tripod, because zoomed live view magnifies every tiny movement.
- A subject with some detail, such as text, an edge, a leaf vein or a distant light.
- A remote release or self-timer to avoid shaking the camera.
The Basic Steps
- Mount the camera on a tripod and frame your shot.
- Switch the lens to manual focus, with the switch on the lens or the camera menu setting.
- Turn on live view or the electronic viewfinder.
- Move the focus frame over the most important detail, such as an eye or a point at the right distance.
- Press the magnify button, often marked with a magnifying glass, to enlarge the view to 5 times or 10 times.
- Turn the focus ring slowly until the detail looks sharpest. Turn a little past it, then back, so you see the peak from both sides.
- Exit magnification, check that the composition is unchanged, and take the picture.
Handy Controls
| Control | What It Does |
|---|---|
| Magnify button | Zooms live view to a set level, often 5x and 10x |
| Touch screen pinch | Zooms and moves the view without extra buttons |
| Focus peaking | Colors edges that are sharp, as a quick guide |
| Display brightness | Makes it easier to see in dim places |
| Image review zoom | Checks the final shot at 100 percent |
Pick The Right Spot
Choose a part of the scene that has contrast and sits at the same distance as the part you want sharp. For a portrait, use an eyelash or the edge of the eye. For a landscape, pick a rock, a sign or a tree branch about one third into the scene. For products, choose a label edge or logo that is on the key plane.
Common Mistakes
- Checking focus at normal size, where small errors do not show.
- Touching the camera and shifting the view while it is magnified.
- Focusing on a smooth area with no detail, so nothing looks sharper or softer.
- Forgetting to turn autofocus back on later and wondering why shots are soft.
- Zooming only once. Always check the actual picture after taking it.
Handy for this: Telephoto Zoom Lens — reach distant subjects. (affiliate link)
Advanced Peaking, Shooting Through The Focus Range And Tripod Stability
Using Focus Peaking Wisely
Focus peaking paints colored dots or outlines over areas with strong edges. It is helpful for a quick check on a moving scene, and it works at normal view without magnification. It can also mislead you. High contrast textures look sharp even when slightly out of focus, noise at high ISO adds false highlights, and peaking levels vary in how much blur they allow. Use peaking to get close, then magnify to confirm. The lesson on focus peaking and magnification explains how to set the color and level.
Shooting Through The Focus Range
When a lens or subject makes the peak hard to find, bracket focus by hand. Turn the ring from clearly soft in front of the subject, through the sharp point, to clearly soft behind it, and watch where the detail was cleanest. Then return to that position from the same direction. For critical work, take several frames at slightly different focus positions and choose the best one at 100 percent. This is also the basis of focus bracketing for stacking.
Aperture, Focus Shift And Depth Of Field
Most cameras show live view at the widest aperture so the screen stays bright. That makes the focus point easier to see, but your final picture may use a smaller aperture, which gives more depth of field. Some lenses also shift their best focus slightly when stopped down, an effect called focus shift. For critical wide-aperture work, focus at the aperture you will use, or take a test shot and zoom into the result. For landscapes, use the hyperfocal distance and then confirm using magnified view.
Tripod Stability And Vibration
At 10 times magnification, any vibration looks like a large shake. Let the tripod settle for a few seconds after you touch it, and use a remote or touch screen to avoid pressing the camera. In wind, hang a bag from the center column and shield the camera. Mirrorless cameras with electronic first curtain shutter or a silent mode reduce shutter vibration. DSLRs can use mirror lock-up. Turn off in-lens stabilization on a tripod unless the manual says it is safe. See stabilization on tripod.
Dark Scenes And Low Contrast
In dim light, live view may show a noisy or dark image. Raise the screen brightness, use the exposure preview or a gain-up setting if the camera has one, and focus on the brightest point you can find. A distant light or a flashlight on a stand-in object can help, as shown in night focus with a flashlight.
Checking Focus After The Shot
Review the image at 100 percent right after the exposure. Look at the eyes or key detail. If the subject moved, or the focus moved when you pressed the shutter, retake it. Some cameras let you jump to the focus area in playback with one button. Doing this check on location is far cheaper than finding a soft image at home.
Try It
- Put your camera on a tripod, switch to manual focus and shoot a page of printed text at f/2.8.
- Magnify live view to 10 times, turn the focus ring past the sharpest point and back, and take the shot.
- Take the same picture with autofocus, then compare both at 100 percent.
- Turn on focus peaking, set it to a bright color and compare it with the magnified result.
Common Questions
How much should I zoom in live view for focus?
Start at 5 times for the whole subject area, then use 10 times on small details such as an eye or a star. Too much zoom can make small shakes look huge.
Do I need focus peaking if I use live view zoom?
No, but it helps as a quick guide. Magnification is more precise, so use peaking to get close and zoom to confirm.
Why is my photo soft even though live view looked sharp?
Common causes are camera shake from touching the camera, focus shift when stopping down, subject movement or a screen preview that did not match the final aperture. Check the shot at 100 percent.
Does live view zoom work on a DSLR?
Yes. DSLRs have a live view mode that magnifies the sensor image, although some use contrast autofocus, which is slower than the viewfinder system.
Related Lessons
- Focus Peaking And Magnification for setting up your camera aids.
- Hyperfocal Distance to choose where to focus in landscapes.
- Stabilization On Tripod for avoiding vibration problems.
- AF Micro Adjustment to fix consistent front or back focus.
- Focus Bracketing to capture several focus positions in a series.
Gear That Helps With This
Hand-picked kit that makes this lesson easier to put into practice.
Some links are affiliate links: if you buy through them we may earn a small commission at no extra cost to you. How this works.