
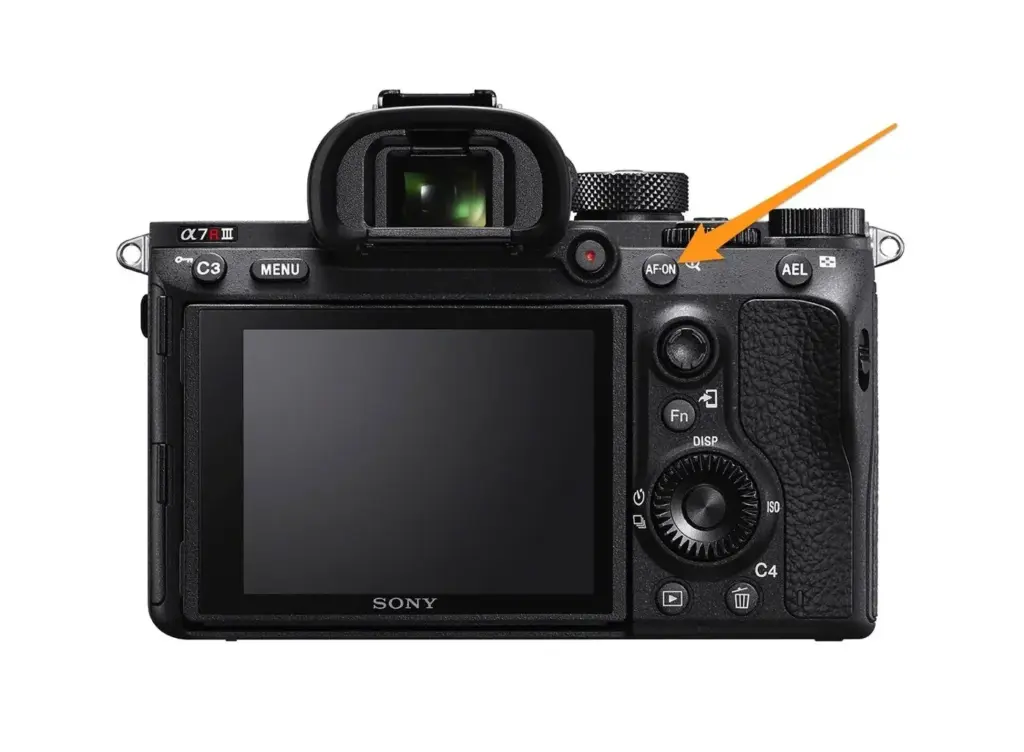
Back button focus moves autofocus from the shutter button to a rear button, usually AF-ON, so your thumb controls focus and your finger only releases the shutter. Hold the button to track a moving subject, let go to lock focus, and press the shutter whenever you are ready without refocusing.
Why It Matters
By default, pressing the shutter halfway starts autofocus, and pressing fully takes the picture. That ties two jobs to one finger. On action subjects it causes missed frames, refocusing at the wrong moment and a lost lock when you let go for a second.
Separating the two jobs gives you control. Your thumb decides when the camera focuses, and your finger decides when it shoots. Many sports and wildlife photographers use this method for every session, and it costs nothing but a few menu changes and some practice.
Beginner Back Button Focus: Setting It Up
The idea is simple. You assign autofocus to a button on the back of the camera, and you stop the shutter button from starting autofocus. After that, the shutter does one job only.
Set It Up
- Open the custom controls or button settings in the menu and find the AF-ON button, or the button your camera uses for autofocus start.
- Assign autofocus start to the rear button if it is not already set.
- Switch off autofocus on the shutter half press. Menu names vary, such as AF Activation, Shutter AF or Shutter/AF-ON button.
- Choose continuous autofocus mode, which tracks a moving subject as long as you hold the button.
- Take a test shot of a moving subject, such as a person walking, and watch how the camera tracks.
How It Feels In Use
| Action | Default Method | Back Button Method |
|---|---|---|
| Start focusing | Half-press the shutter | Press and hold the rear button |
| Track a moving subject | Hold the half press | Keep holding the rear button |
| Lock focus on a still subject | Hold the half press | Release the rear button |
| Take the picture | Press fully | Press the shutter at any time |
Why It Helps With Action
- You keep tracking while the subject moves, then fire bursts without interrupting focus.
- Focus stays put when you let go of the button, so an obstruction does not make the camera hunt.
- You can switch from tracking a runner to a locked focus on a spot where the runner will arrive.
- Recomposing stops being a half-press balancing act. See focus and recompose.
Common Beginner Problems
- Pressing the shutter and getting a soft shot because the thumb was not on the button. Make it a habit to press and hold before every shot.
- Thinking the camera has stopped focusing. It is waiting for the button, so check that you assigned it correctly.
- Handing the camera to someone else. They will find that nothing focuses, so remember to change the setting back, or tell them about the rear button.
- Using the button with single autofocus on moving subjects, which locks focus after the first confirmation.
Give yourself a week of ordinary shooting to build the habit. At first it feels awkward, and then you stop thinking about it.
Handy for this: Fast Prime Lens — creamy backgrounds, low light. (affiliate link)
Advanced Switching Between Single And Continuous AF And Recomposing
One Button For Two Modes
With the shutter freed from focusing, you can leave the camera in continuous autofocus and still get the effect of single focus. Hold the button to track, release it to lock. That means one camera setting covers moving and still subjects, with no mode change and no risk of the camera sitting in the wrong mode when the moment arrives. If your camera allows a second button for a different focus area, such as a wide zone, assign that one too and switch methods by thumb. Learn how tracking works in continuous autofocus.
Recomposing Without Refocusing
Place the focus point on the subject, press the rear button to focus, release it, then move the camera to compose and shoot. Because the shutter does not refocus, the focus distance stays where you set it. This works for portraits and still subjects. Keep the subject at the same distance from the camera when you recompose, because swinging the camera in an arc changes the distance slightly, which matters at wide apertures. For close portraits at f/1.4, move the focus point instead of recomposing. The more detailed trade-offs are in focus and recompose and autofocus area modes.
Tracking And Subject Detection
Modern bodies can lock on to eyes, faces, animals, cars and birds. When using back button focus, hold the button while the camera finds the subject, then keep it down while the subject moves. Releasing it stops tracking, which gives you a clean way to restart when a new subject appears. Eye detection works especially well with the thumb held down. See eye autofocus for how the camera chooses the eye.
Release And Focus Priority
Camera menus let you choose whether the shutter fires only when focus is confirmed, which is focus priority, or fires every time, which is release priority. For action bursts, many people prefer release priority so they never miss a moment because the camera hesitated. For portraits and still subjects with wide apertures, focus priority prevents soft frames. With back button focus, the shutter button always releases if you set it for release priority, so you decide whether the picture was worth taking.
Practical Techniques For Action
- Start tracking early, a second or two before the key moment, so the system has time to lock.
- Keep the thumb pressed while firing a burst, then release between bursts to rest your hand.
- For a subject that will appear at a known spot, pre-focus there, release the button and wait with the shutter. This resembles zone focusing.
- Use a small focus area for single subjects in a crowd, and a larger zone for erratic subjects such as birds.
Video Use
For video, back button focus lets you start and stop autofocus at will, which stops unwanted refocusing during a take. On many cameras the shutter button starts recording, so the rear button is the only AF control. This gives you the choice of leaving focus fixed or tracking only when you need it.
Making It Reliable
Choose a button that your thumb reaches without shifting your grip, and test it with gloves if you shoot in the cold. Name your custom setting in the camera menu so you can switch back to the default setup in a moment. Practice at home on a pet or traffic, and delete the results, until your thumb presses and holds without thinking. Once it is automatic, you can keep your eye on the action rather than on the camera.
Try It
- Assign focus to the rear button, switch off focusing on the shutter and take ten shots of a still object, pressing and releasing the button each time.
- Track a person walking toward you with the button held down and fire a burst.
- Focus on a fixed spot, release the button and fire when someone walks through that point.
- Recompose a portrait with the focus point at the edge and the subject at the same distance, and check sharpness at 100 percent.
Common Questions
Which button do I use for back button focus?
Use the AF-ON button if your camera has one. Otherwise, assign autofocus start to another rear button in the custom controls menu. The name varies by brand, so check your manual.
Do I need continuous autofocus for back button focus?
It is the most flexible choice. With continuous autofocus you can hold the button to track and release to lock, so one setting covers still and moving subjects.
Is back button focus better for action photography?
Many photographers find it easier because the thumb controls focus and the shutter finger only fires. It stops the camera from refocusing at the wrong moment during bursts.
Can I go back to normal focusing later?
Yes. Turn shutter button autofocus on again in the menu. Many cameras let you save settings as a custom mode so you can switch in seconds.
Related Lessons
- Back Button Focus for a general overview of the technique.
- Continuous Autofocus for how tracking mode works.
- Focus And Recompose for composing after the focus is set.
- Autofocus Area Modes for choosing points and zones.
- Eye Autofocus for subject detection on portraits.
Gear That Helps With This
Hand-picked kit that makes this lesson easier to put into practice.
Some links are affiliate links: if you buy through them we may earn a small commission at no extra cost to you. How this works.