
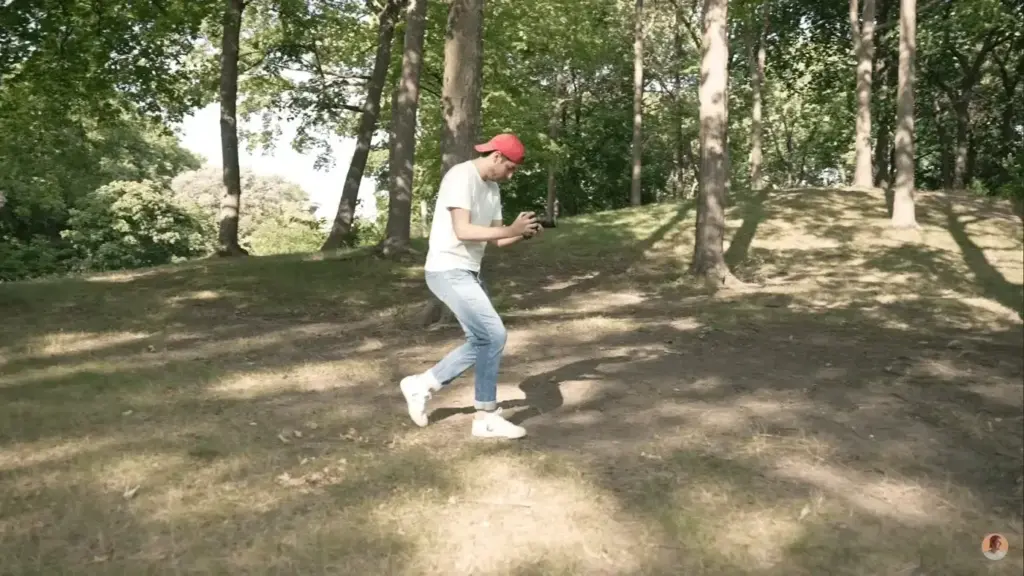
Steady walking shots come from technique before gear. Bend your knees slightly, roll each foot from heel to toe, tuck your elbows against your body and hold the camera close to your chest. Add a strap, turn on stabilization and use a wide lens, and the bounce of each step mostly disappears without a gimbal.
Why It Matters
Handheld footage while walking tends to look like a bobbing, shaky mess, because every step sends a jolt through your body into the camera. A gimbal removes that, but it adds cost and weight, and it is not always allowed or practical.
Good walking technique can give footage that looks smooth and intentional, and it combines well with camera stabilization and a little help in editing. The same habits also improve every other handheld shot you make.
Beginner Walk Like A Camera Operator
The goal is to make your body act as a shock absorber. Your knees and hips take the bounce of each step, so the camera glides along. Practice without recording first until the movement feels natural.
The Walking Technique
- Stand with feet about shoulder width apart and bend your knees slightly.
- Hold the camera with both hands, elbows tucked against your ribs.
- Step forward by placing your heel down first, then roll through the foot to the toes.
- Move slowly, about half your normal speed, and keep your upper body level.
- Let the knees and hips absorb each step, as if you were gliding over ice.
Camera Position
- Keep the camera close to your body, either at chest height or against your forehead with the viewfinder.
- Avoid holding it out at arm length, which amplifies every wobble.
- Use a wider lens, because wide angles show shake far less than telephoto lenses.
- Keep the camera level by watching the horizon line in the screen grid.
Simple Gear Help
| Tool | What It Does |
|---|---|
| Neck strap | Pull it taut against your neck to form a triangle with your arms |
| Wrist strap | Keeps the camera secure and lets you hold lightly |
| Hand grip or cage | Gives your hands a wider, firmer hold |
| Monopod or folded tripod | Acts like a shoulder pole for a fluid, low bounce |
| Backpack strap trick | Use a strap or cord under the camera to hold it steady |
Types Of Steady Walking Shots
- Follow shot, where you walk behind the subject, keeping a fixed distance.
- Lead shot, where you walk backward in front of the subject with a helper guiding you.
- Side tracking shot, where you walk parallel to the subject.
- Point of view shot, which should be done slowly with wide framing for comfort.
Common Mistakes
- Walking at normal speed, which makes the bounce more extreme.
- Landing on your heels with straight legs, which sends a thump to the camera.
- Using a long lens, which magnifies every movement.
- Looking only at the screen and not where you are stepping.
- Recording the first step and the last step, when the body is not yet in rhythm.
Start recording a moment before you move and keep rolling a moment after you stop. You can trim the unstable start and end in editing. Walk a short path several times, because the second or third take is almost always smoother than the first.
Handy for this: Camera Gimbal — smooth handheld footage. (affiliate link)
Advanced Strap Tension, Stabilization And Post Fixes
Strap Tensioning
A neck strap works as a stabilizer when you push the camera away until the strap is taut. The strap forms a triangle between your neck and your two hands, which locks the camera into a stable position and resists vertical movement. Extend slightly forward and keep the tension light, because pulling too hard can cause its own tremors. A wide strap is more comfortable than a thin cord, and shortening it to chest height works best. Combine this with the elbow tuck and you get a basic body-mounted rig. The same principles for lighter handheld work appear in handheld video.
In-Camera Stabilization Settings
Optical lens stabilization and in-body stabilization handle small, quick vibrations. Many cameras also offer an electronic mode that crops the frame by about 10 to 20 percent and corrects larger motions, sometimes called active or dynamic stabilization. Use it for walking shots when you can accept the crop. Turn on both lens and body stabilization together if your camera supports combined control. Read image stabilization for how each system works, and note that stabilization should be turned off on a tripod.
Shutter And Frame Rate Choices
Motion looks natural with a shutter angle near 180 degrees, which is a shutter speed of about twice the frame rate. At 24 frames per second that is 1/48 second, usually set to 1/50 second. A faster shutter freezes each frame and exaggerates any wobble, while a very slow shutter causes smearing. A higher frame rate such as 60 frames per second also helps, because you can slow it down to 24 for a floating look. See the 180 degree shutter rule and shutter angle for the reasoning. Use ND filters outdoors so you can keep these settings in bright sun.
Post Stabilization
Editing software can analyze motion and smooth it. Tools such as Warp Stabilizer in Premiere Pro or the stabilizer in After Effects crop and warp the frame to remove jitter. Use the smoothest setting that avoids a wobbling, jelly-like look, and shoot a bit wider than you need so you have room to crop. Rolling shutter can make footage wobble when it is stabilized, so keep movements gentle. Other editors have similar tools, such as the one described in Filmora stabilization. For the best result, correct the large motion in camera and leave only a small amount to software.
Using A Support Pole Or Monopod
A monopod held against your belt or chest acts like a pendulum and absorbs vertical bounce. Collapse it to the height of your sternum, grip it with both hands, and walk with your knees bent. Keep the camera on a fluid or ball head if you have one, so you can adjust framing. The result is usually smoother than a bare handheld shot and lighter than a gimbal, so it is a good compromise when you travel.
Try It
- Walk across a room with your knees bent, rolling heel to toe, and record a ten second clip.
- Repeat it with the neck strap pulled taut and compare both clips side by side.
- Switch on electronic stabilization and walk again, then note the crop.
- Set the shutter to 1/50 second at 24 frames per second and compare it with 1/500 second.
- Apply Warp Stabilizer or another stabilizer in your editor and judge whether it helped or added wobble.
Common Questions
How do I walk smoothly while filming?
Bend your knees, roll each step from heel to toe, tuck your elbows and walk slowly. Keep the camera close to your chest and use a wide lens so the bounce of each step is absorbed by your body.
Do I need a gimbal for steady shots?
No. Good technique, a strap, stabilization and post stabilization can give smooth footage. A gimbal makes it easier and gives more reliable results, but it is not required.
What lens is best for walking shots?
A wide angle lens is best, since it hides shake far better than a telephoto lens. Around 16 to 28mm on full frame is a good range, and an optically stabilized lens helps even more.
Is post stabilization good enough?
It can help a lot with mild shake, but it crops the image and can create warping on bad footage. Get the best result in camera and use software for the last small corrections.
Related Lessons
- Handheld Video for general technique with no support.
- Image Stabilization to understand lens and body stabilization.
- Warp Stabilizer to smooth footage in Premiere Pro.
- Gimbal Basics when you decide to add a gimbal.
- Shutter Angle for the natural motion blur that hides shake.
Gear That Helps With This
Hand-picked kit that makes this lesson easier to put into practice.
Some links are affiliate links: if you buy through them we may earn a small commission at no extra cost to you. How this works.